Hi everyone, I’m quite new to printing. I’m designing a 28-page A4 brochure and want to advise my client on the best binding option. The brochure will be handed out at a trade show, serving as a handbook to help customers choose the right product.
Is perfect binding possible for a brochure with so few pages? I googled it, but some sources say it’s possible, while others say it isn’t. It will be printed in the UK, by the way.
What about other stitching methods, like staples? I’d appreciate any insights on what to consider. Also, how does pricing compare between different binding options? My client doesn’t seem too concerned about the budget as long as it meets the purpose.
For 28 pages, stapling (sometimes called saddle-stiched) is your best option. There are also various kinds of wire bindings if the budget and design call for it. However, the go-to solution would be saddle stitching with staples.
There’s also cheesier binding, such as glue, plastic spines, and combs, but if your client wants to make an impression, I’d stay away from them.
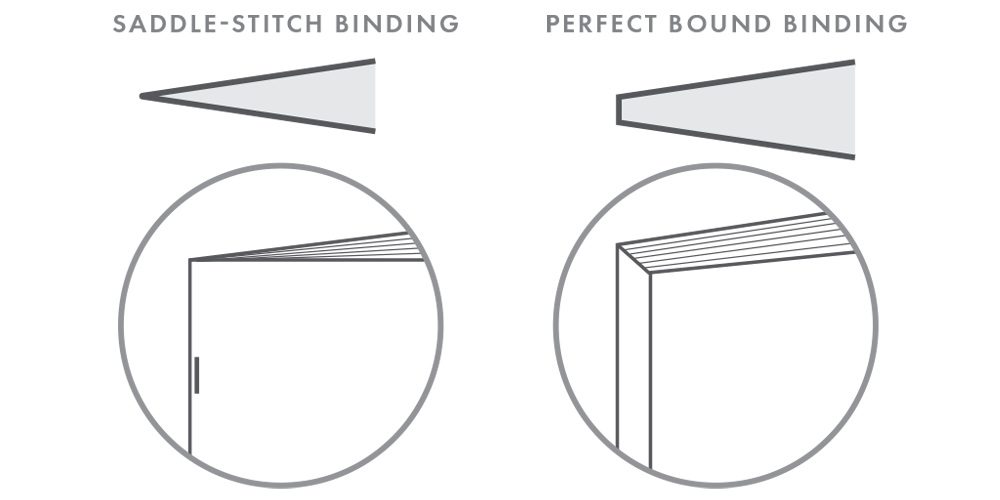
There aren’t enough pages for perfect binding. I suppose it’s barely possible, but it would be iffy and a waste of money.
It might be possible with 28 pages if you opt for a thicker paper stock to help meet the minimum spine requirements, but even at this the spine will be so thin that printing on it will probably not be an option.
However, the rule of thumb for saddle stitch is around 96 pages as a maximum (and that’s with very light paper stock) before you start considering the switch to perfect binding.
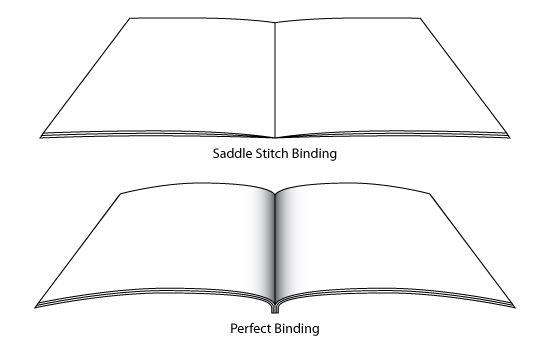
For a 28 page brochure saddle stitching is typically the best option.
Saddle stitch is cost effective and quick to produce, which is great for a trade show brochure. On the flip side, you lose the opportunity to print on a spine something perfect binding offers. But with only 28 pages, perfect binding can be a bit iffy unless you really commit to heavier stock and potentially higher costs, in paper costs and in finishing costs (perfect binding).
Also with perfect binding you’ll need to adjust the design inner margins to compensate what is lost in the spine - sometimes the printers handle this, but it’s best to design with this in mind - some of the paper needs to get glued into the spine region
Thank you for your detailed explanation, I really appreciate it. I guess I’ll go with saddle stitch then.
Another question: When it comes to printing specifications like bleed, margin, etc., is there a general size guideline for setting up my document, or does it depend on the specific printer’s requirements?
Also, what’s the standard paper type and GSM for both the cover and inner pages that feel high quality and not cheap?
Generally speaking, most printers will set up your document with a 3 mm bleed on all sides to cover any trimming variation, and you should keep your important content at least 5–7 mm inside the trim edge as a safe area. That said, these values can vary slightly from printer to printer, so it’s always a good idea to check their specific file guidelines or talk to them directly.
Some printers may require a 5mm bleed, so it’s best to confirm their specs beforehand.
For paper stock it depends on the finished look they want. If you pick 80gsm uncoated stock self cover then it will look like a church newsletter.
More premium look would be 250gsm gloss cover with 120gsm silk inner pages.
It’s something you can discuss with the client and the printer and even ask the printer for a dummy which show the finished product using white pages only and no content.
Typicaly, it’s not the designers job to spec the paper, typically you hand the file to the client and they handle the printing.
And if you give the file to a printer they’ll need to spec the job to give a quote. And typically they’d analyse the file/content and recommend something suitable.
When I was a print buyer this came to us all the time, as people didn’t know what spec to even ask for, they just wanted a church newsletter printed, or a glossy coffee table magazine.
Typcially the printers recommend the best options .
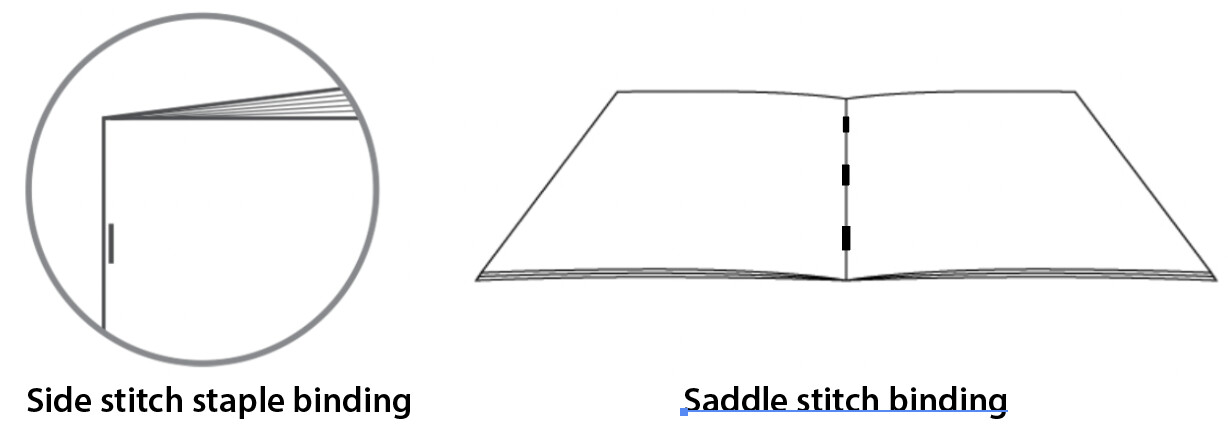
Smurf2 already knows this, but one of the examples he showed might be a little misleading. Terminology varies from place to place, but the first example looks more like side stitching than saddle stitching. A saddle stitch is where the staples are exactly in the fold and not on the side. See below.
Here’s one more clarification. Smurf is right, he’s an expert at this, but even though most printers prefer a 3mm (1/8 inch in the US) bleed for a saddle-stitched brochure, you need to set that up on your artwork; you don’t want to leave it up to the printer. For example, if you have a photo bleeding off the edge, you want to make sure the photo extends 3mm beyond the edge of the page. You don’t want to have the printer do something weird, like stretching the photo to create the bleed.
As for specing paper, Smurf2 is correct; for most jobs nowadays, the client coordinates the printing, and the printer will ask the client if they want coated or uncoated paper. Personally, I hate this development because clients know nothing about printing and will likely send it off to a cheap online gang printer, thinking they can save money.
This is OK if the end product doesn’t need to look perfect. However, I prefer to choose the printer and the paper stock myself. On high-quality jobs, the printing and the look and tactile feel of the paper can be critical. For example, most printers will choose gloss-coated paper, but depending on the job, you might want matte-suface-coated paper or an uncoated specialty paper. You might also want a heavier paper for the cover or to self-cover (use the same paper throughout) the booklet to save the client a little money.
There’s also the matter of media coatings. Uncoated paper doesn’t need a coating, but ink on coated paper can smudge, so you might want to specify an aqueous coating, which is clear and prevents the ink from fingerprints and smudging when handled. You can also specify various kinds of aqueous coatings that provide a silk texture or a gloss look. There are also varnishes, but that’s a subject for another time.
Firstly, I think the image is a bit misleading it was just showing the staple. I found it online and assumed it was meant to show it on the spine.
That being said, I’ve definitely seen saddle-stitched brochures with staples in that location due to a bad feed, a lazy print finisher, or just a machine not set up correctly. Believe me, I’ve seen worse.
When it comes to print finishes, there are so many options. But for a 28-page brochure, you don’t want something too light or too heavy. Ideally, you want to strike a balance.
It’s worth popping into a local print shop to ask for samples of 28-page brochures, discuss stock choices, and get a feel for the pricing. A good old-fashioned chat can really help to avoid nasty surprises.
I echo Just-B—if it’s gang printed (multiple jobs run together to save money), the quality won’t necessarily suffer, but it might not have the same crispness as a print job handled from start to finish by a dedicated printer.
For a 28-page A4 brochure, perfect binding is technically possible, but it’s usually recommended for thicker books—typically 48 pages or more—because the spine needs enough thickness for the glue to hold the pages securely. With only 28 pages, the spine would be very thin, and the brochure might not open as smoothly or hold up well over time.
A more common choice for brochures this size is saddle-stitching (staples along the fold). It’s cost-effective, quick, and works perfectly for 28 pages. You also get a nice flat finish, which is great for handing out at trade shows.