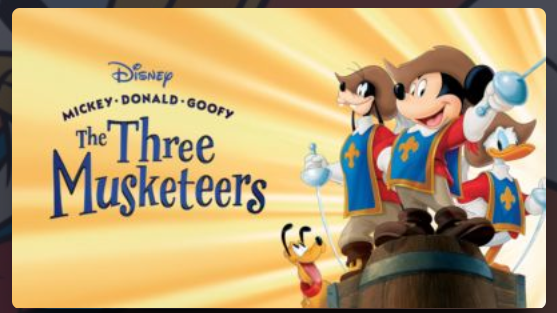
Hey. I know how to do a starburst. But the way this starburst was done seems to be hard for me to imagine how to do in photoshop or illustrator. None of the methods I think of can recreate it in this exact same way. Now it might be obvious, but I can’t figure it out. Does anybody have an idea as to how to recreate this starburst exactly the way it looks here?
there is no right answer to this.
Photoshop is easy.
Illustrator would be more difficult.
And since I’m not a pro in Photoshop, how I’d do it probably isn’t the right way. But cover your canvas with orange, choose a vanishing point, dial in the eraser tool at various densities and have at it (the shift key is your friend for staight lines. Then apply a gaussian blur to the whole mess. That’s the fastest I can think of. I’m sure there are more uh…polished techniques.
Thanks for the tip! ![]()
I don’t think “exact” is realistic. I’m quite certain the original artist wasn’t aiming for exact either. Instead, this person probably played around with whatever software tool he or she had until the effect seemed right.
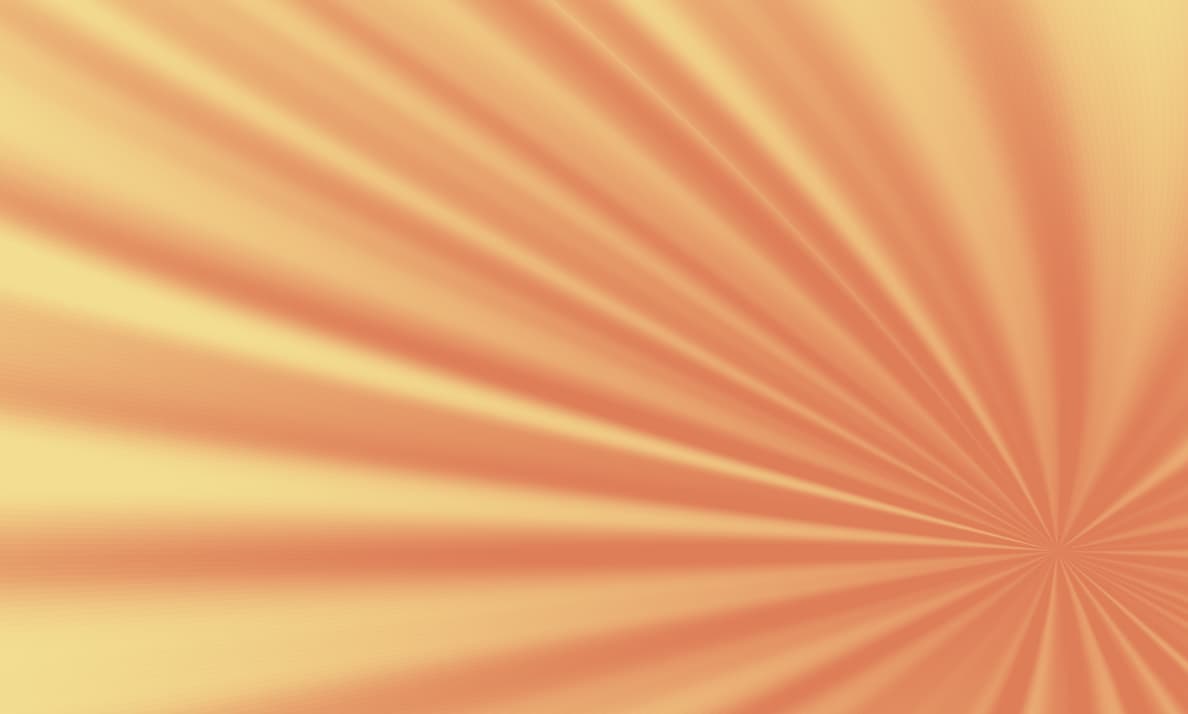
Anyway, in Photoshop…
Create a high-resolution blank image. Use the gradient tool to create a top-to-bottom gradient using whatever colors you like. Go to Filter > Distort > Wave. Using that tool, play around with the sliders until you get a complex and irregular top-to-bottom series of rays. Go to Filter > Distort > Polar Coordinates to create a starburst from the rays. Go to Filter > Distort > Twirl and slightly twirl the image. Go to Edit > Transform > Warp and play around with the control points and handles to warp the image in whatever way seems appropriate. Then crop the piece of the image that looks about right.
There are likely multiple ways to do this in various programs. What I did here was pretty much the first thing I tried.
2 Likes
****Reminiscing about Kai’s Power Tools Gradient Lab
3 Likes
I have to admit, that’s a technique that I would not thought of.
1 Like
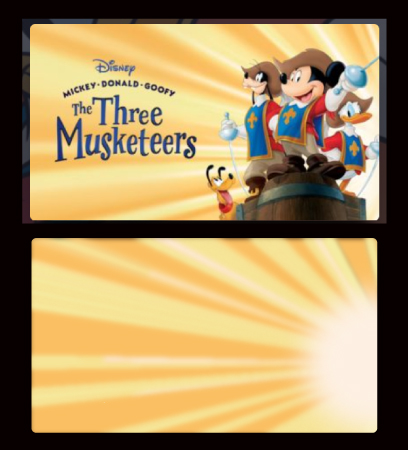
I’m replying to my own question here. But here’s my progress (and yes this is ridiculous but here goes).
My current personal method that gets me the closest to the same result is to create a star in illustrator, scale all the inner points far in so the star is thin, scale up the star, rotate the star to fill the gap and copy paste, repeat that like 10 times. Place star at the right spot.
And then I go into pathfinder and fill in the exact same spots the needed colours were in the picture after cutting off the edges of the stars with a frame box first. After this I applied a gaussian blur to everything and added an additional white circle with gaussian at the original white spot.
I have yet to figure out how to optimally place every colour on my own incentive without any reference with it looking optimally aesthetic for the eye, but at least I have a way to recreate the shapes made.
Its far from being optimal yet but at least I can recreate it to an extent.
1 Like
I was following this thread. Stunning results - well done!
Thanks ![]()
This topic was automatically closed 365 days after the last reply. New replies are no longer allowed.