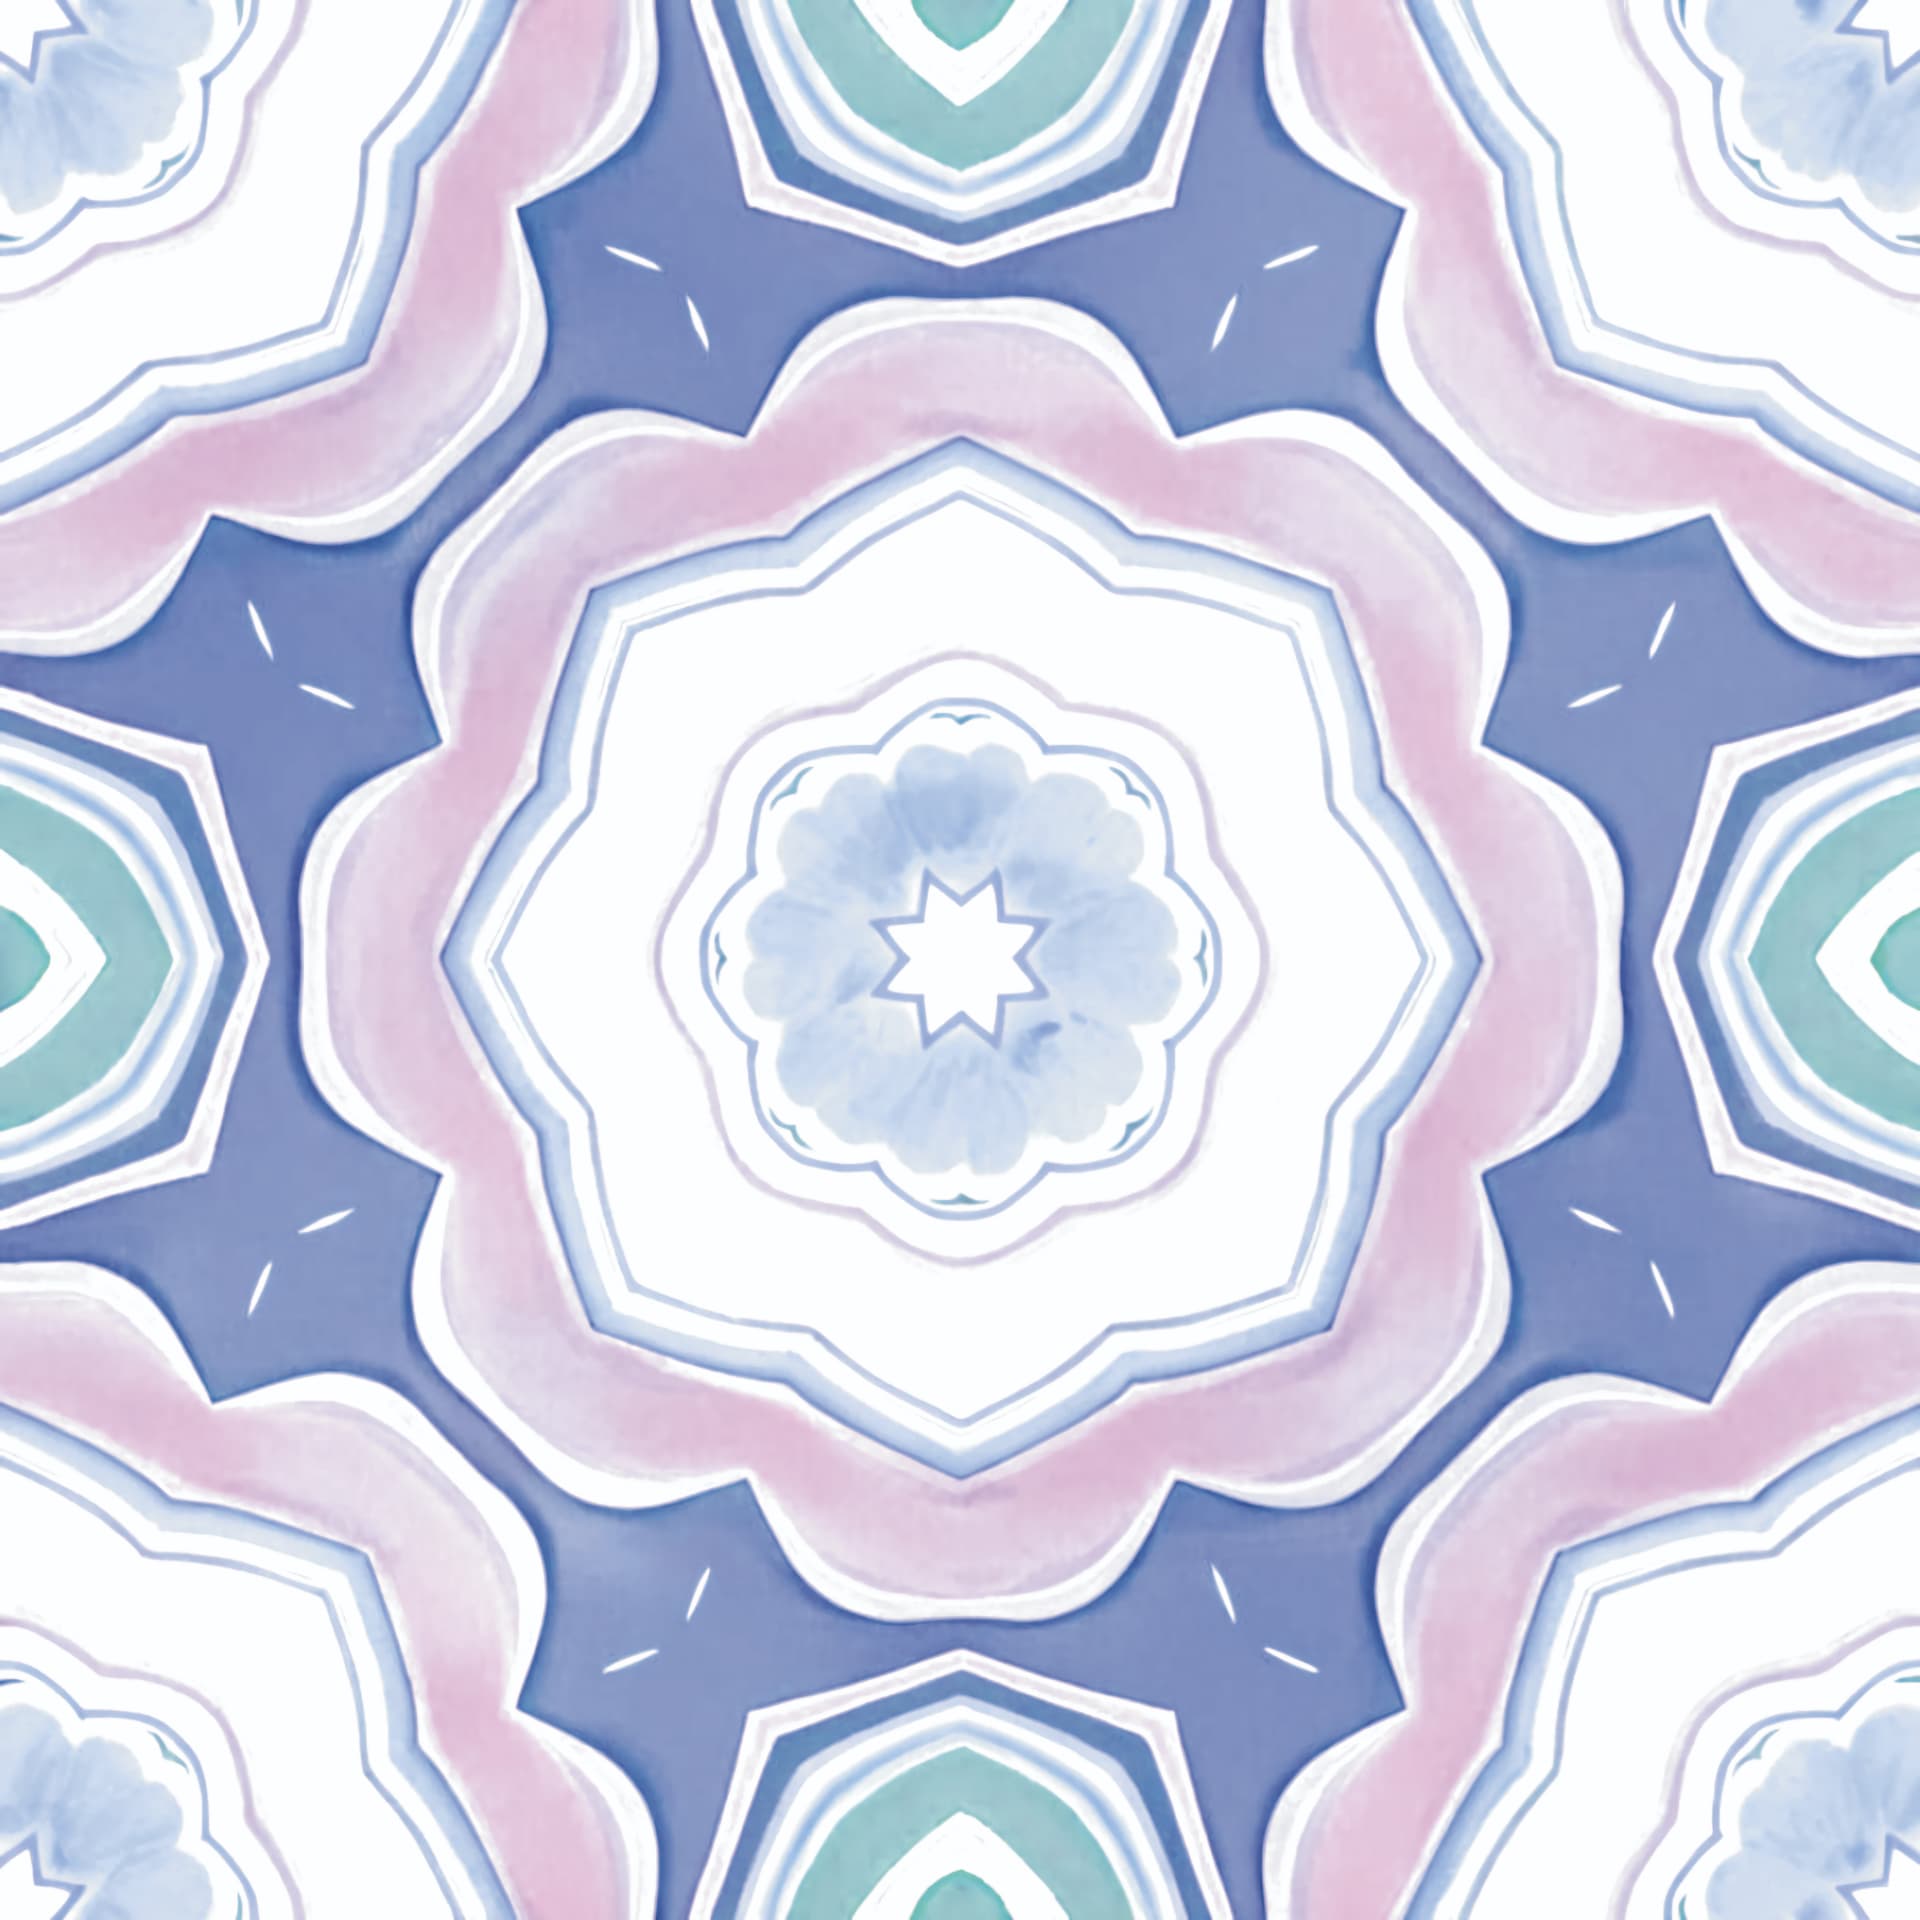
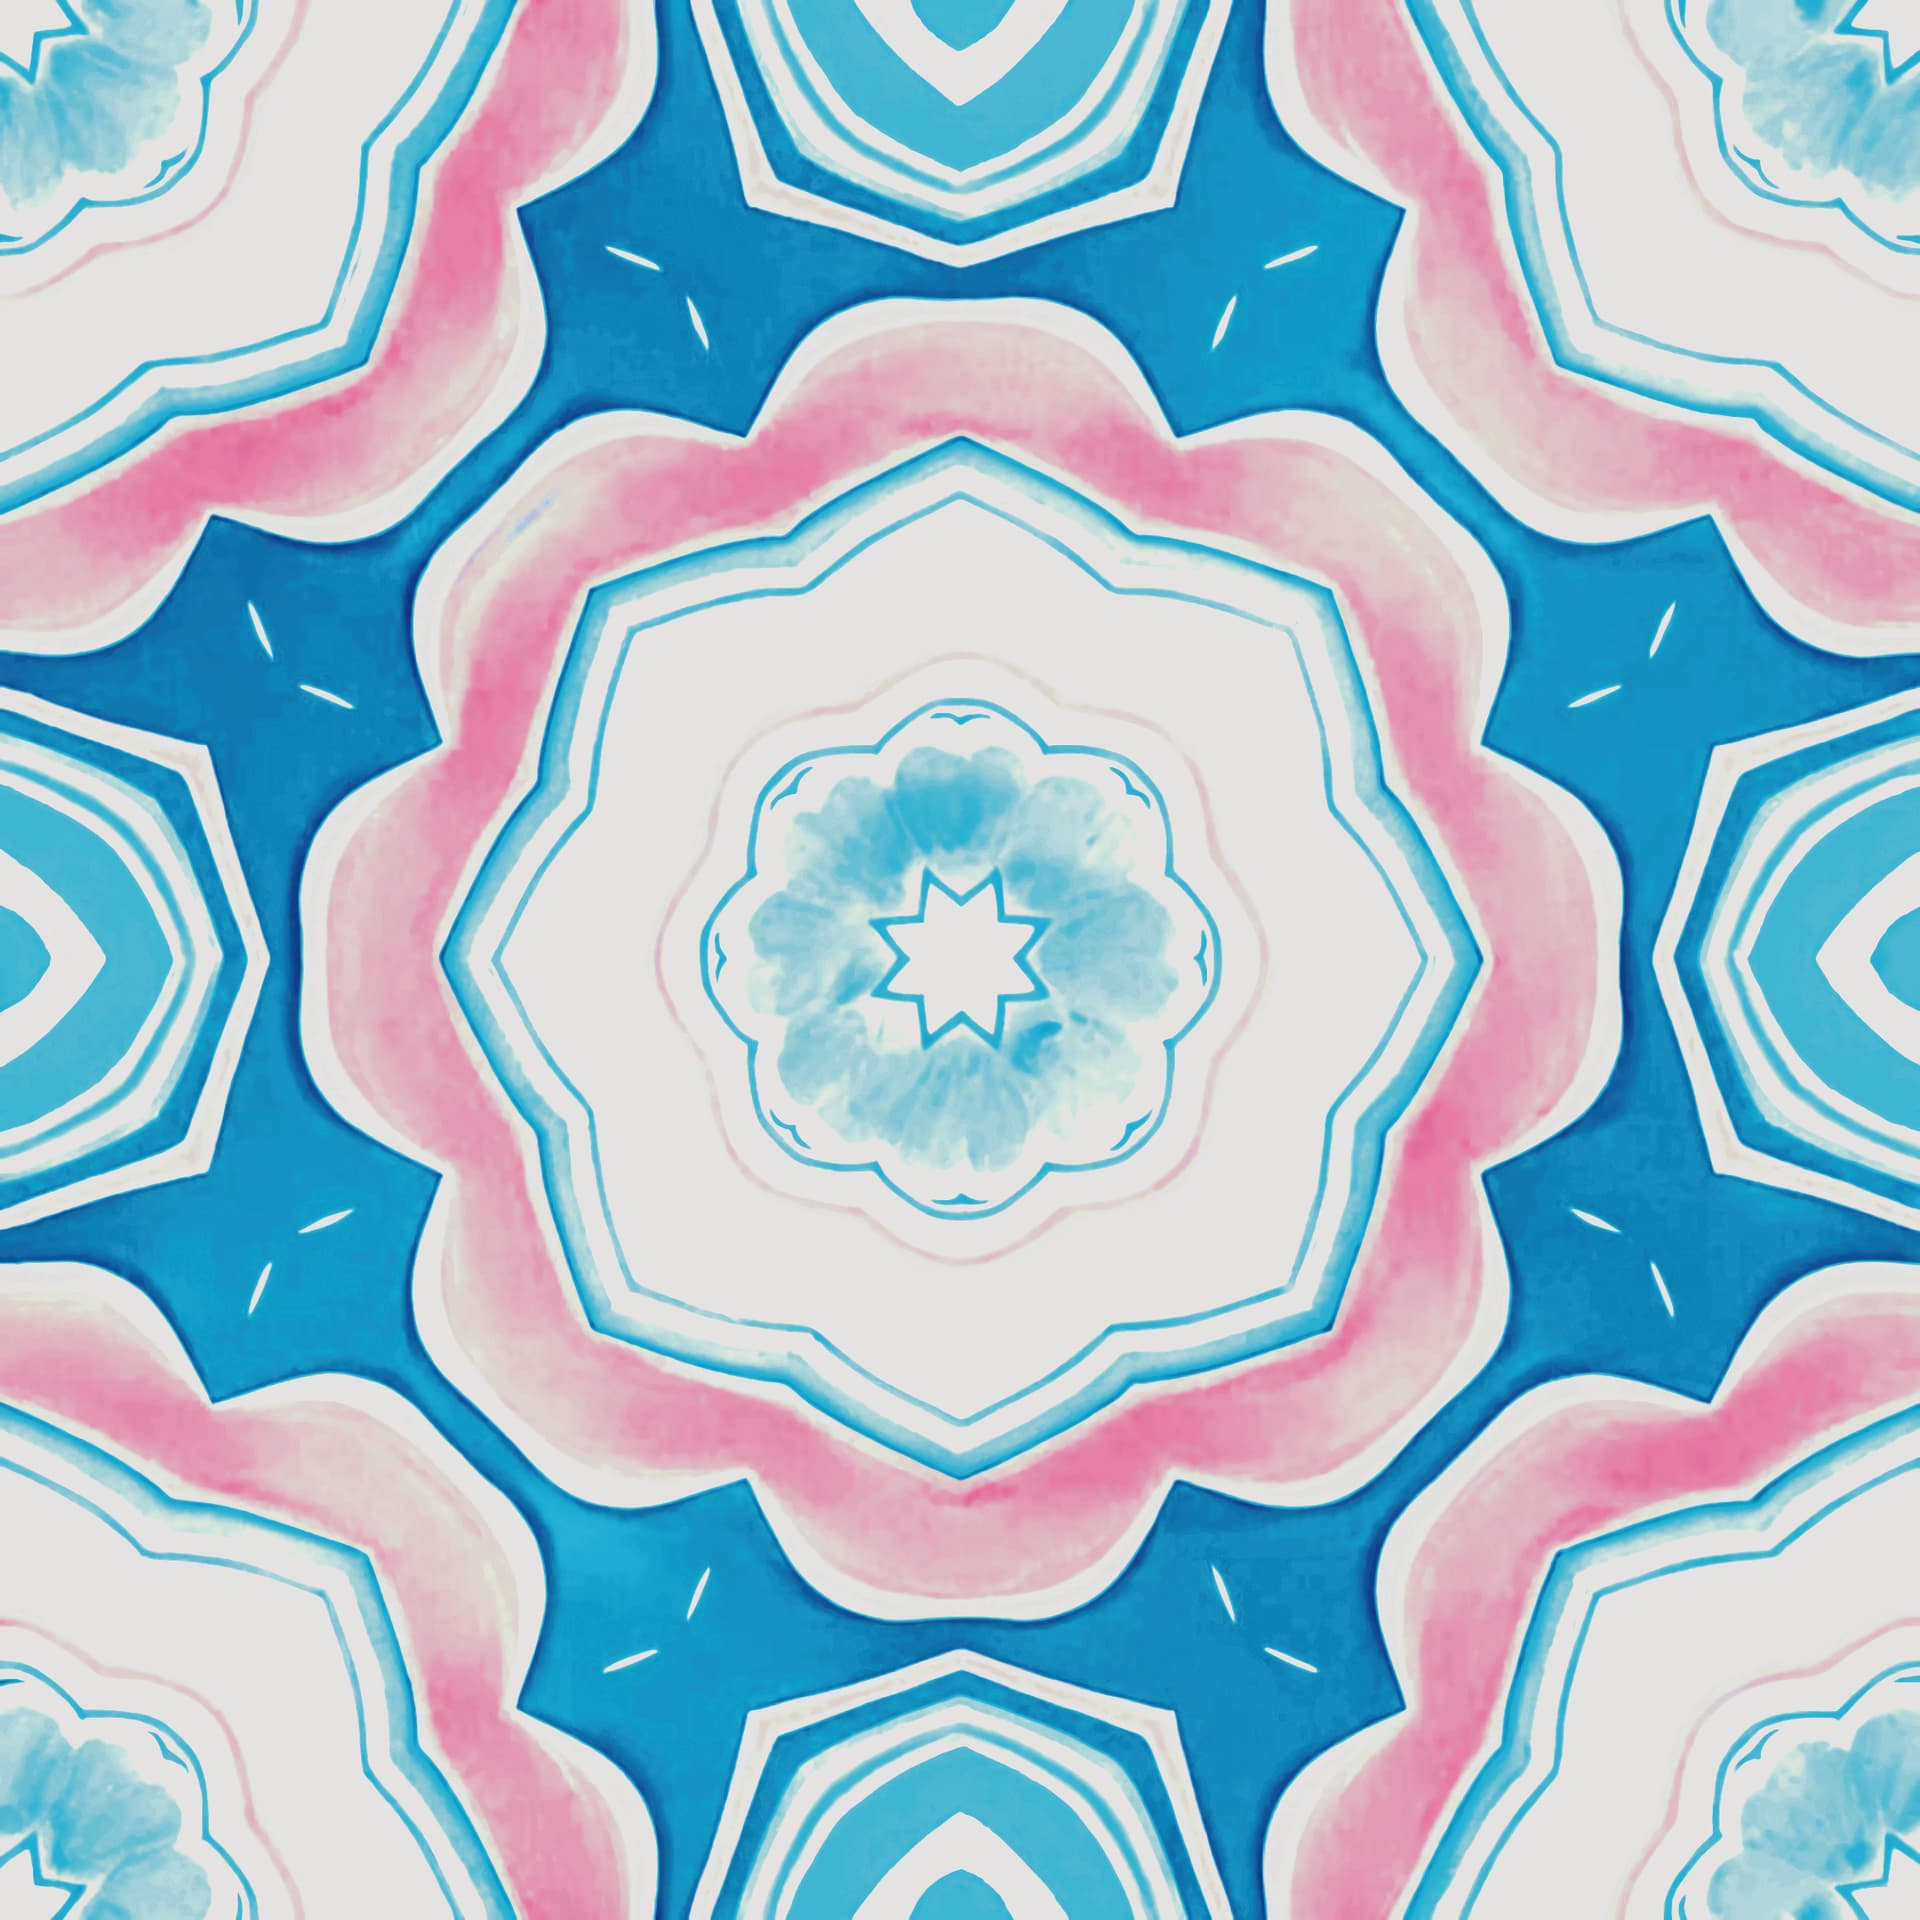
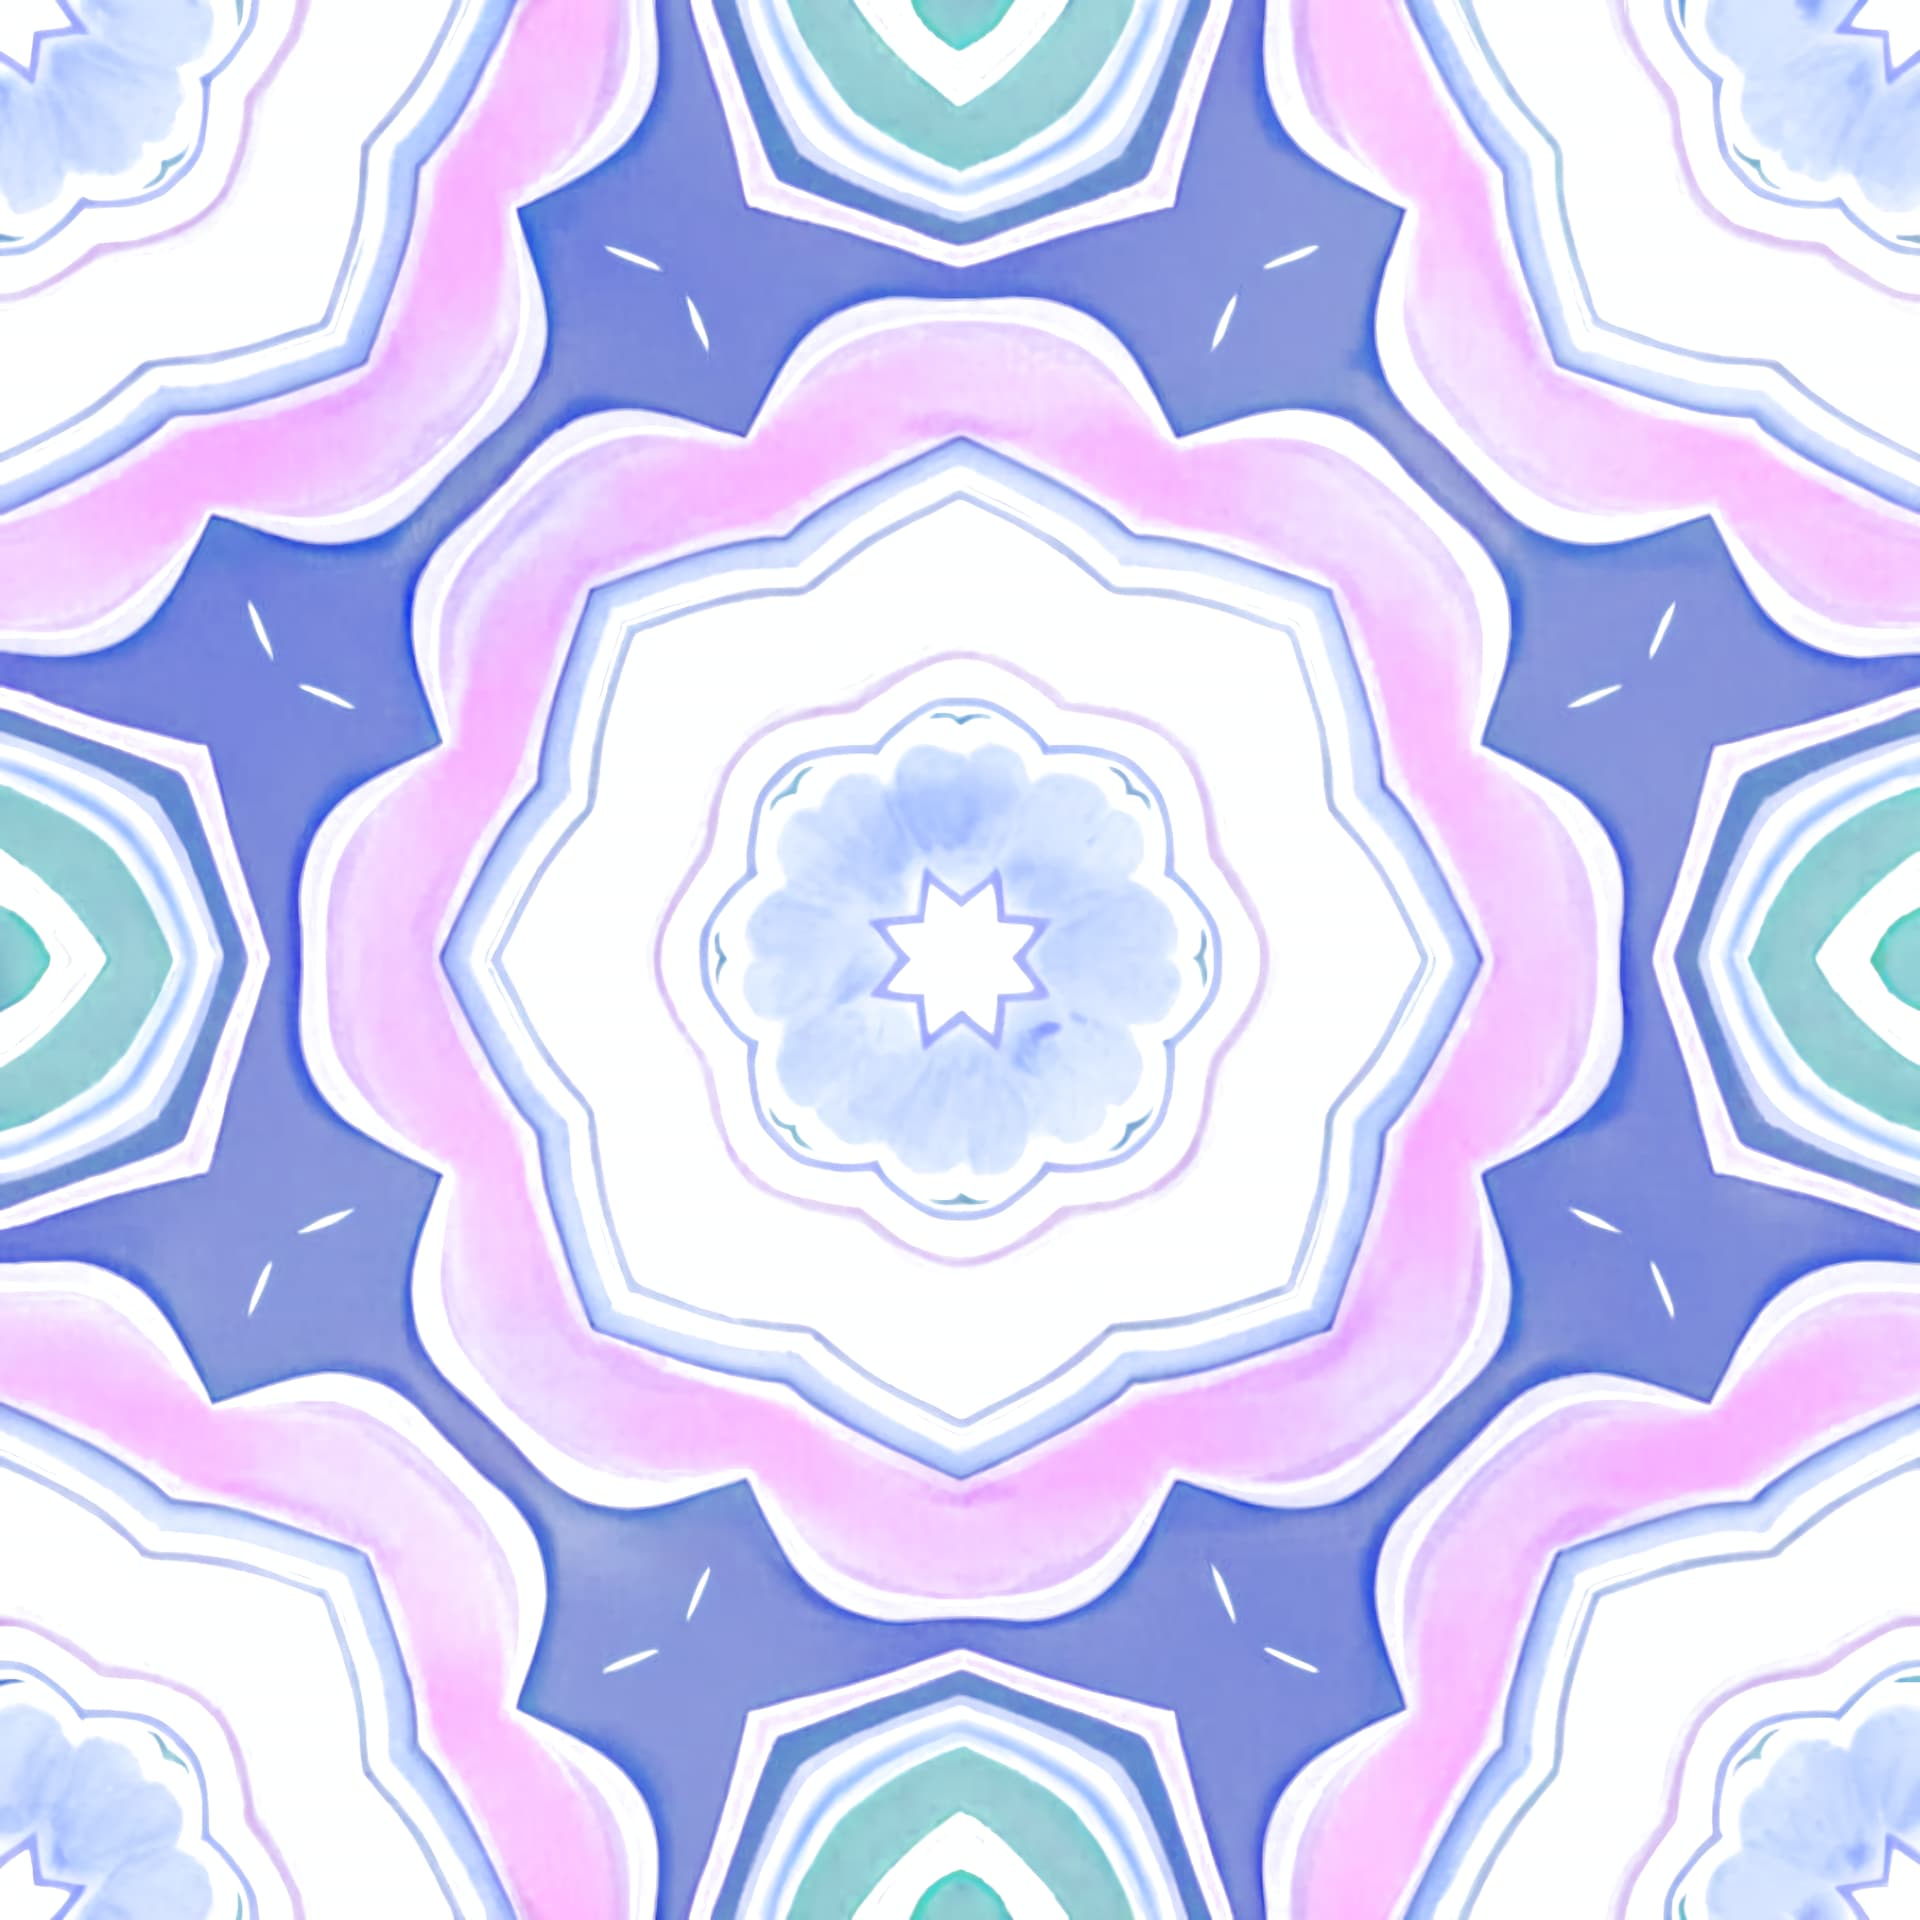
Hello, could someone please advise me on how i can convert a seamless tile I designed with Repper tile design to a CMYK compatible format without the colors looking unacceptably dull or dirty looking? I’ve attached 3 images, one is the original which i designed in Srgb and the other 2 are what the output was when i just converted it straight to CMYK (which was also exactly what it looked like when i ordered a sample from Redbubble with the original srgb file) and the other is the result of me trying to alter the saturation, cmyk color values etc with the converted CMYK file (this is the more saturated image). Both the images that resulted from the CMYK conversion look dirty and dull in terms of colorisation. I’ve tried to follow online advise on using the original srgb and converting it to cmyk then tweaking various color settings in photoshop - I’m aware that the color range is going to be more limited in cmyk and will look different but surely there should be a way to produce an image which doesn’t look dirty or dull color wise? Also I don’t understand why the advise i was given from someone at Repper to change it to CMYK alter it then change back to srgb PNG image doesn’t work. All that happens if I convert it to CMYK and then back to srgb is the colors change back to srgb range and don’t keep to the CMYK colors. Also i tried soft proofing but again if it’s saved as a srgb png the colors still stay as srgb. I’m just not seeing any way i can upload these images to Redbubble without getting unacceptable colors as a result. I’ve read that some people don’t have any problems with uploading an srgb file to Redbubble and getting acceptable results. Sorry this post is a bit long but some advice on where I’m going wrong and what i could possibly do to get an acceptable color result would be so helpful.
Try
in Photoshop, instead of Image > Mode,
go to Edit > Convert to Profile.
Select: US Web Coated (SWOP) v2
as your profile and see if that helps.
Thanks- i did try that but the colors still look the same.
Send on the image - not the one posted here - as a link or a download and take a look.
Are any of the above 3 images the original?
Can you post the original?
I’m sure you’ve seen this thing:
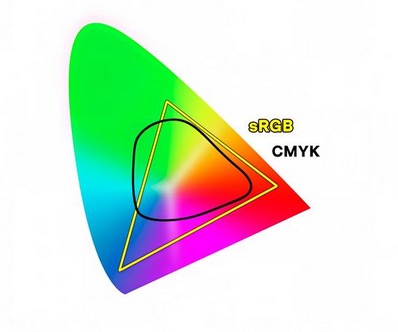
If your colors are way out in the points of the yellow triangle, there is not much hope of you getting them into CMYK.
I’m not familiar with the gang printer you are using. Do they offer any kind of job options download (probably not, if you are submitting photoshop files…)
Hi, yes the third image is the original. My problem is that I’m only getting quite dull or dark colors when I’m trying to alter it within a cmyk profile using saturation, brightness, altering the cyans, magenta values etc and they look kind of dirty colors too. Also I don’t understand why then converting it back to a png rgb file the brighter rgb colors just come back again when i was told that converting to an rgb png file would keep the cmyk colors it was converted to. Even soft proofing and then saving the file as rgb the same happens.
Uploading your image here might be changing the colours - can you provide a download link from a shared drive or similar?
This is packed with exactly the type of confusion people often have when moving from the safe, sugary playground of sRGB into the brutal, colour-hungry badlands of CMYK.
Why are you converting between colour spaces and formats?
sRGB is a colour space designed for screens, monitors, phones, TVs. It is relatively small in gamut (range of colours) but matches what most screens can show nicely.
CMYK is a colour space designed for ink on paper printers can only handle pigments, not light, so they mix Cyan, Magenta, Yellow and Black to approximate colours.
When you print an sRGB image directly, the printer or print company has to guess how to convert it to CMYK. That guess is usually rough and mechanical, leading to washed-out or muddy results.
If you convert yourself, you get control you can tweak the image to look its best within the even further limited CMYK space.
Why change formats (PNG, JPEG, TIFF)?
PNG: best for web, transparency, sRGB, but bad for CMYK because PNG does not officially support CMYK colour spaces properly (although it can embed a colour profile of CMYK but that’s not for the feint-hearted).
JPEG: can hold CMYK but compression can degrade image quality. Often good enough for basic print.
TIFF: best for CMYK, supports layers, no compression loss. The gold standard for professional printing.
PSD: even better as the layers can be accessed in InDesign if required.
How to properly convert and prepare the image
Start with the original sRGB file (best quality possible).
In Photoshop, Edit > Convert to Profile.
Source Space: sRGB
Destination Space: Choose the CMYK profile that matches your printer.
If unsure, US Web Coated (SWOP) v2 is a general default.
But ideally use a custom ICC profile from your print vendor (maybe Redbubble can help and let you know or you can find the information).
Tweak carefully in CMYK space.
Increase brightness a little.
Tweak saturation (but do not overdo it).
Accept that some colours are impossible to match. Especially very bright greens, blues and pinks. They are simply out of gamut for CMYK.
Save your working file as a PSD or TIFF in CMYK if you want to keep editing.
OR save a flattened high-quality JPEG
(or PDF/X-4a if you are adding Live Text to the artwork - saving as PDF retains the text for best sharpness)
Do NOT convert back to sRGB if your end goal is print.
If you save a CMYK image back into an sRGB PNG, Photoshop will map the CMYK colours back to a wider RGB space, often undoing your careful adjustments.
Why your process is failing.
Saving as an sRGB PNG after converting to CMYK makes no sense if the target is print. That just re-expands the colours into screen space again, which only looks good on a monitor, not on paper.
Soft proofing is good, but it needs a solid understanding of what you are proofing for. You are looking at a simulation of how CMYK will print, but if you save the file incorrectly, it gets ignored.
Stay in CMYK for anything intended to be printed.
Accept that some colours cannot be saved. Design into the CMYK space, do not just force bright colours and hope for the best.
Screens lie to you. What you see on your CMYK changes are an approximation of a RGB feedback on your monitor - unless you’ve callibrated your monitor to the output profile you’re pissing into the wind.
You can get a good result but not identical to the RGB colours.
I’m not sure why there’s a question about this. The third image you said is the original RGB is out of gamut for CMYK. As a result, when converted to CMYK, the out-of-gamut RGB colors are converted to the nearest CMYK equivalent. There’s not much you can do about this if the printer requires CMYK rather than RGB.
Once converted to CMYK, you might try increasing the saturation a little. It won’t restore it to the original RGB colors, but you might see a slight improvement.
What am I missing here? This seems like a pretty basic problem.
Hi thanks for your detailed answer. As i was wanting primarily to upload designs to Redbubble I tried to follow their advice which was to work with a cmyk profile then convert to a srgb png file so that’s confusing if as you say that can’t work as it puts it back into the rgb color space again. I think they also take high quality jpg files so maybe that’s the answer. The third image i uploaded looks the same as it does on my monitor working in Photoshop, obviously i don’t know how different it may look on your monitor. I’ll try the things you suggested, my main aim is just to get reasonably nice looking high quality colors so I’m not really bothered too much with having the exact brightness or same colors as rgb.
These are from Redbubble.
https://help.redbubble.com/hc/en-us/articles/360059051872-Printing-digital-designs-on-products
https://help.redbubble.com/hc/en-us/articles/202270679-Dimensions-Format
All that said, your issue lies in the PNG format. Just don’t.
Use JPG format. That way you can keep your CMYK colors.
PNG is for web and I have no idea why a ‘printing company’ insists on using the format for print. JPG is bad enough. And they specifically say you can’t use TIF or PDF. That crosses them out of my book almost entirely. (though I do have one or two specialty vendors that use jpg format…not by my choice.)
.png…
unless maybe you need the transparent background?
That’s why I’d use TIF, higher quality, no compression.
This is a total side note; but I was not familiar with Redbubble, so I took a look. I saw a hoodie on the home page with art that looked strikingly familiar to me. You’d have a hard time convincing me the hoodie is a parody or anything other than a blatant rip off of Thrasher Magazine. Sigh.

Yes not sure how Redbubble works in protecting other people’s copyright over very similar designs. I’ve seen mixed reviews about them online from people trying to sell their artwork for POD so I’ve been looking into alternatives. Printful told me that they use an upgraded cmyk color space and advised me on the srgb profile to work with, I’m just not sure about them due to the prices of the products and shipping which seem a bit offputting to buyers and sellers. If anyone has any advice about POD services that are better that would be helpful too.
For your current issue you’ll just have to accept you won’t get the same vibrant colours out of CMYK - get as close as you can then revert back to SRGB and the file format they requested.
That’s all you can do.
I can’t add much that hasn’t already been said, except maybe if you plan to have the seamless tiles stitched together, maybe as a wallpaper, don’t use jpg as a file format. even at the highest quality, the compression algorithm can of all things change one ore two complete pixel rows at the borders, and you’ll see the stitching in some cases. and you can’t cut that away, since it would be generated again after cutting.
With redbubble, there isn’t much choice. Jpg or png. That’s it.