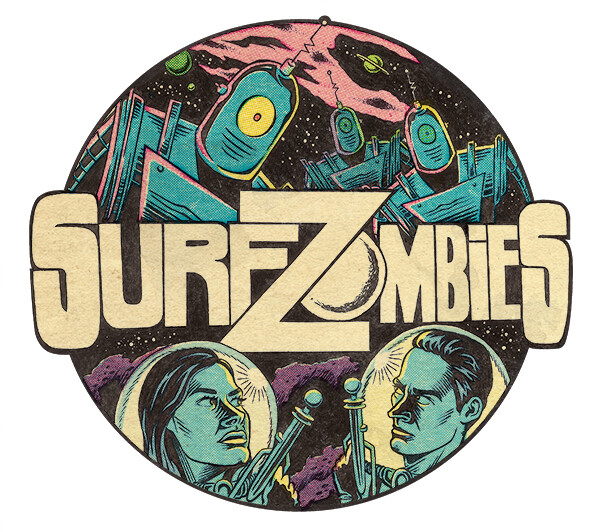
I made a custom die-cut sticker design but realized it needs a 1/8" bleed so the artwork doesn’t get clipped off. I added a thin black outline to the whole design, with a bleed extended out of that, but I realize the inner outline I intend to keep in the finished piece is awfully small (see files). The final design is about 5" wide.
This is going to come down to the capabilities of whoever is selected to print/cut/produce the product.
One print shop may be fine with this, and another may not.
Yeah, my understanding is that laser cutting might be precise enough to handle it. Crossing my fingers. But I’d rather thicken the entire outline than run the risk of the outline being cut offset.
You’ve got two things going on here, the bleed and a border inside the cut. If the cut is off even a little (and it will be) your border will look uneven. As with any border, it should be at least 3mm, ideally more. I would consider reducing the size of the artwork slightly to make room for a larger border inside the cut.
You don’t show your die line, but I’d say WheresMyCoffee and StudioMonkey have it exactly right. My go-to label vendor’s prepress guy would want the overall size of the design reduced to add distance inside the die cut. Others would just run it and risk more noticeable inconsistency (side-to-side/top-to-bottom) between non-black ink and the cut.
They are laser cutting a printed vinyl sticker?
Not many people do that. PVC vinyl and laser = chlorine gas = bad for the laser…it would void the warranty on the one we have.
We’d balk a bit at something that tight, no guarantees, but might take it on as a challenge. Since your outline is a bit uneven to begin with, no harm no foul, right?
We could do this kind of thing very easily and accurately with our Zund’s, if we were doing a one-off and ran the machine with proper ‘quality’ cut settings at a slow speed.
It’d be a nightmare on long runs at production settings though, and even that is material dependent.
Vinyl; ezpzLemonSqueezey
0.030 magnetic - pleasedeargodnomakeitgoaway
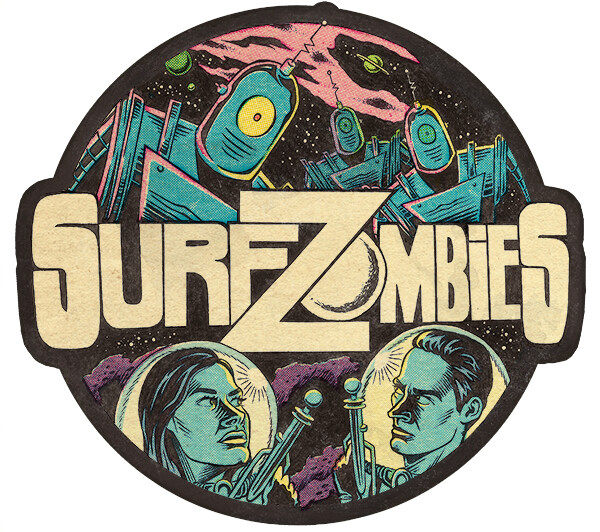
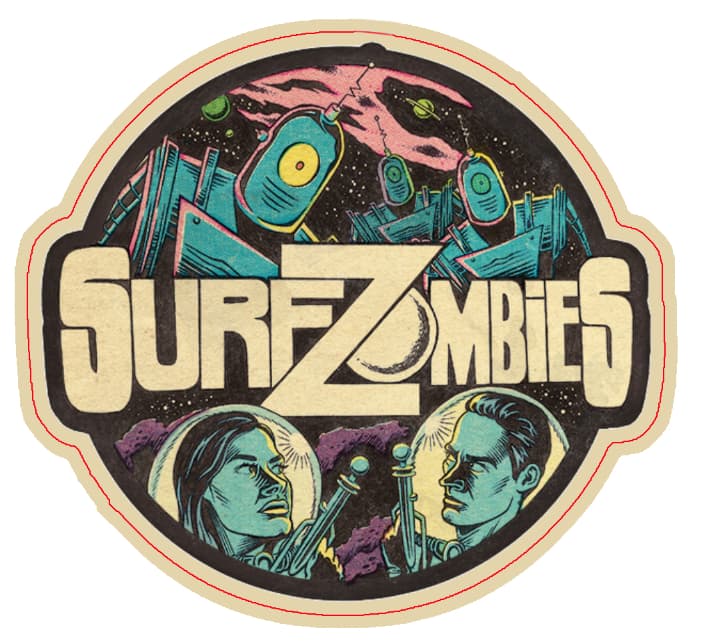
We’d much prefer to see the 2nd image as the final product; die line/cut line at the edge of the black, with a bleed 1/8in beyond that.
For what it’s worth, I actually prefer the look of the second version where you show the bleed. I realize you probably did the super thin border to mirror the thin black areas between the letters, but, at least to my eye, the thicker black frames the artwork nicely. So, if it were me, I’d run with the second version and then add your bleed on to what is shown.
The artwork is very nice. Did you illustrate that yourself or is that found art or stock art?
I like the looks of the much thicker black outer border too. If were me, I’d include that border as part of the printed artwork while offsetting the dieline (in red) even further out to create a second tan (or perhaps white) border.
Thank you! I illustrated the black ink by hand, then scanned & colored using KraftTone’s Photoshop brushes and textures. It’s for a local band and is meant to channel vintage EC Comics art.
I like both looks, so if the printer has any hesitation, I’ll probably go with the thicker black outline for the final product.
I’m not sure if this intended to be vinyl–just a basic sticker, I think. I told them a matte finish would be preferred over glossy to maintain the old comic/newsprint look.
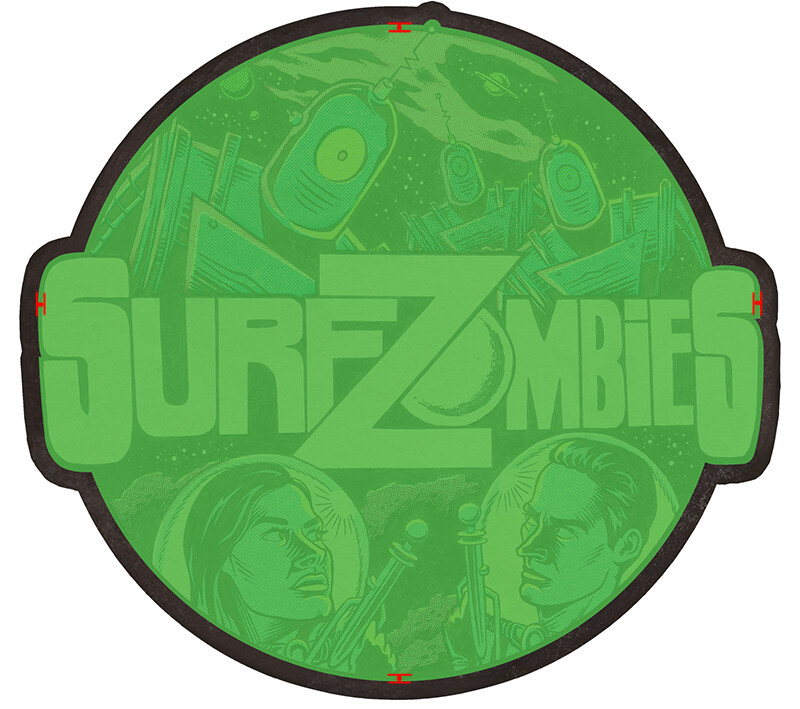
Attached you can see the finished print/die-cut area tinted in green, with red markers indicating the final black outline. Quite thin. If the printer has any hesitance, I’ll just do a much thicker black outline–perhaps just shy of 1/8", with an additional 1/8" bleed.
You didn’t ask about this, but in addition to the bleed issue, I’m wondering how you plan on having these printed and where you anticipate these stickers will be used.
I’m assuming you plan to have them printed on a vinyl substrate, such as Fasson, which is different from printing on paper. Reproducing the type of artwork you’ve shown will require 4-color process printing. The stickers won’t work outdoors if you’re considering inkjet printing using water-soluble inks. Even non-water-soluble 4-color process inks are transparent and will fade in sunlight.
If you use screen printing or any process that involves halftones or screen meshes, you could run into moirés with the artificial halftone dots you’ve used in the artwork.
I’d also be concerned about the detailed textures (and halftones) you applied to the artwork. They would work fine when printed on paper, but on vinyl, um, I’m not sure — the subtleties could be easily lost.
I’m not saying a conscientious and capable printing company can’t mitigate these problems and offer suggestions and choices. I am saying that printing your artwork on vinyl comes with a few printing gotchas that you’ll need to be certain your printer can deal with.
As I said to you on another forum - put more bleed than you really need - each printers will require different tolerances.
Having more is better than having less. And it means the printer has some lean to produce it the best they can.
You haven’t made it printer friendly.
The ideal situation is to increase your artwork - either by increasing the size slightly - and I know you don’t want to lose the Robots antenna - but you could cut off the bottom illustrations slightly if you increase the artwork and keep the position from the top.
Or you could add to the artwork and increase the bleed all around by adding more to the drawings to have more bleed.
Having a black trim around it is going to be really noticable if it’s off by any amount - and it will look extremely odd.
You’re far better off not having any black trim - and just diecut into the artwork itself.
Your real preference here is that you should not cut into the artwork too much - so you should add to the artwork on all sides to provide a quality safe zone that can be trimmed into.
And if you did this when I mentioned it first you’d be done by now and have no concerns going to print.
Seconding this. If I use a dedicated, professional printer, I can confidently print a border. If I’m using a cheaper online printer like Moo, I don’t design using a border since their cutting is pretty imprecise and the end result will look sloppy. Since your design has a fun, handmade feel, the precision of your border may not matter all that much, but it should definitely be considered.
We print these types of stickers all the time, 4-color or 6-color solvent inks, often onto the same vinyl that is used for car wraps. If white ink on clear is required, we use Latex or UV cured inks.
It’s a bit more custom than the usual web-run mass produced stickers, but I’m guessing on these, there isn’t a quantity of thousands here.
There are usually no issues with moires when halftone dots occur in the art. There are no screens. Just ink jets. It has to be a pretty tight line screen to mess up (ie if it’s a screen-produced photograph like a scanned newspaper image, and is reduced in scale to the point the dots are close to the spew pattern). This one would be no problem.