Hi,
Currently, if you drag-and-drop an image into InDesign, it will create a frame corresponding to the print size of the image (height/width), regardless of resolution. Is there a way to force InDesign to place an image at a predefined resolution – say 300 ppi – instead?
No, not really, unless you know the dimensions of the image at that resolution and pre-draw a frame of that size. Or, you could size the image that way before placing.
Part of the beauty of InDesign is that it’s image resolution-agnostic. That is, it doesn’t impose a particular resolution; you can have images of any resolution, all mixed in the same layout. Then when exporting to PDF, you can apply a maximum resolution, if desired.
What leads you to believe that automatically resizing images to an effective resolution of 300ppi is something you’d want? Why do you think you need 300ppi? Despite common “wisdom,” the truth is, you rarely do.
You should NEVER drag and drop anything into InDesign.
As in NOT EVER.
Always Place. And always Link.
You can Embed later if you absolutely have to.
You can copy/paste from one doc to another, in a limited fashion but doing so from Illustrator to Indesign may do strange things to any vector art with effects in it. Best to place that too.
The worst thing you can do is open an image in Photoshop then drag that image into Indesign.
I have no idea where those go, but they are not listed in the link palette. They’ll print, usually. At whatever resolution and with whatever embedded profile you saved them with. They can’t be checked during preflight. They don’t show up in the preflight panel as even existing.
Don’t do that.
5 Likes
Oh yeah, and ^THAT^
To the initial question.
You don’t have that choice in InDesign, but you could do the following.
Change the resolution without resampling in Photoshop to the ppi you want.
When you place the file it will be at the resolution defined in Photoshop.
Don’t scale it up or you will lose your PPI
To PD
What you don’t do is Copy/paste then you embed the picture, but when you drag and drop into an open InDesign doc it s also a link that you can find in the links panel.
I don’t do it but it is possible
Carlo
1 Like
This would require that InDesign also have raster image editing abilities, which is not what InDesign is intended to do — it’s a layout application. Do your photo editing in Photoshop. If you’re looking for ways to save time, create a Photoshop action. Besides, a little bit of sharpening typically helps most photos, and that sharpening is best done at the final size and resolution. And if you don’t care about that and finalize all your InDesign files by saving them to PDF, Acrobat can resample all the images in the file down to whatever resolution you want easily enough (you certainly don’t want to upsample them, by the way).
1 Like
I see I need to explain my workflow a little for my question to make sense!
I work at an architecture company an I often use InDesign in the idea-generation phase with clients, where image resolution is irrelevant. So I drag-and-drop from various folders (drawings, reference images, screen shots, web downloads) and these files need to stay in the various folders they came from to keep the proper links. These are huge projects with a lot of references and people working on different files.
I drag-and-drop 100s of images at a time and most of them are way oversized when I place them. So I need to resize / downsize a lot of images to get them to fit in the page! It would be a better workflow for me if they weren’t so huge when I place them, which they would be at 300 ppi).
As for resizing / editing in photoshop this comes later when I prep the InDesign document for presentation. At this point, about 5% of the initial images are left.
So to sum up, I don’t need 300 ppi, just “smaller” images without editing the original file. Perhaps there’s a different way of improving my workflow?
Okay. Ultimately, it will be up to you whether this helps, but with with the problem as you describe, I’d try working it this way:
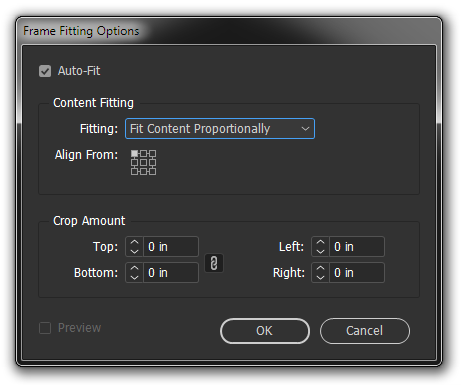
- In InDesign, with no document open, choose Object > Fitting > Frame Fitting Options and set it like this:
- Click OK. (The options set will become the default for all new frames.)
- When you’re ready to drag in images, choose the frame tool (tap the F key) and draw out a frame that will be of manageable size for the image.
- Now instead of dragging the image to the page, drag it to the frame and it will fit-down to the size of the frame.
- To take it a step further, if you have multiple images to drag to one page, set a grid of frames, rather than dragging them out one-by-one. To do that, again with the frame tool click/hold/drag, but before releasing, tap the up-arrow key x times to add x frames vertically in a column, and/or the right-arrow key x times to add x frames horizontally in additional columns. Then release to set the frames.
(Up and right arrows increase the number of frames, down and left decrease the number.)
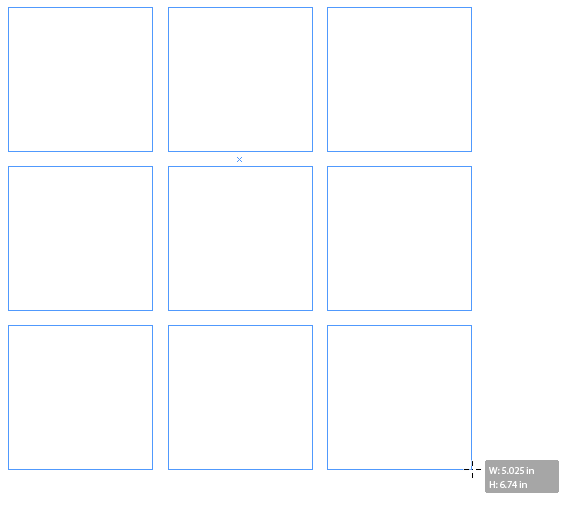
Frames set in a grid this way will also honor the auto-fit defaults set earlier.
1 Like
I still don’t see why this can’t be done with placing them rather than dragging and dropping them. If anything, that works better since as you said if someone edits an original file, you can easily update it since it’s been placed and linked.
HotButton’s advice on his last bullet works perfectly for placing images too. When using place, Click cmnd/ctrl when selecting multiple images and then use the arrow keys to increase rows and columns of your image grid and voila.
1 Like
Personally, I’m with you in the never-adopted-a-drag-and-drop-workflow camp. But, Grafitekt’s description of the workflow did get me to thinking that the assembly of preliminary layouts using external assets from multiple sources may lend itself to drag-and-drop being much more efficient than having to engage a file-navigation maze every time the Place command is invoked. Drag-and-drop, done correctly, is a viable Place equivalent, and a much more visual task. I probably won’t ever change my core methods, but I see now why I’d consider drag-and-drop if I was faced with a similar workflow challenge.
1 Like
Yes HotButton you hit the mark! Bunch-of-frames tool will make this a lot easier. Yes using Place might me a quicker way if it places all the images in the frames at once.
As for using drag-and-drop from a folder rather than place, all I’m doing is bypassing the dialogue box (and the possibility of using options). There’s no difference in the way the images are linked.
Yes, we have mazes within mazes of subfolders, comes with the territory when projects span several years!
As for a more efficient way of downsampling images, automating the process just wouldn’t be that difficult with a custom script.
It’s been years ago, but when I was in charge of the website at the daily newspaper, we would get dozens of photos coming through every day that needed to be resized, resampled and given suitable names for inclusion on web pages.
We automated the entire process by creating a computer directory where, if a photo was placed, the software app would see it and automatically process it to what we needed, then store a copy in another folder. It was all tied to some Mac application that I’m sure no longer exists, but I’ll bet the same thing could be done using the Mac automator, Photoshop actions, varying amounts of AppleScripting and, for all I know, off-the-shelf apps. I’m guessing something similar could be done within Windows.
1 Like
Do you really need to use indesign to do this?
Adobe Bridge makes “Contact Sheets” from smart collections.
Yeah, you can do the drag and drop thing as long as it isn’t from another program pane. It’s bad practice though.
You’re making me curious - I remember a time when it wasn’t possible to drag-and-drop, so this has changed. Why is it bad practise?
Yes, PLEASE embed them too. This is Design 101. garbage in = garbage out.
If you trust your pressman, give them as much leeway as you can and you’ll get a better print. It took me over a year to convince the salesforce here that I didn’t have the placed images needed to print because the customer says “But they look good on my computer”.![]()
Yeah, they’re in your library, or in a link, or saved as a smart object and placed, so you have them. All I have is the link to tell me where it is on your computer and a low res FPO.
PDF’s saved at high res give you a lot of flattening options and prepress tools that can help extract higher quality images from art, but it’s still best to have (IMO) an .ai file with placed and embedded psds. If the embedded file is huge, then place the image(s), save the psd(s) in a separate ART folder that you provide to the printshop, and instruct them in notes on the Illustrator file margins to “embed all images”. That way they can work on the illustrator file separately and not have the draw time of massive embedded psd images.
Also, learn and practice flattening transparencies… a lot.
Finally, there are TONS of ways to maximize your print quality with smart objects without affecting draw or RIP time dramatically.
I don’t like embedded objects. Yeah, I know you can “unembed” them but that’s a step I feel is unnecessary for ME to take. And absolutely none of my outsources want them either.
Links, much better.
I’m a firm believer that designers should know their software well enough to hand off files the way they need to be handed off to get the best result. Unfortunately that can often be process specific. If doing a new-to-you process or using a new vendor, get up to speed on the specs before doing the designing.
1 Like
As usual, I cannot argue with your points. But I can dream of a world with perfect clients right? ![]()
Right, this is thread has been majorly derouted from OT, I’m off.
Thanks for your input, I got some valuable tips for improving workflow pre-pre-prepress phase and I’ll take that with me.
Ser you later!