Hi everyone, I am new here and this is my first post. Recently I am working on a poster design job and the final print is going to be 1.78 x 1.78 meter, which is about 6 ft x 6 ft. I am an illustrator/ artist working in traditional medium and I want to do a drawing for the poster. I know the image need to be in 300 dpi but 6 ft x 6 ft is too much for me to do, and scan. I usually work on small-size paper like letter/A4/A3, or 18x24 inches at most.
I checked my scanner and it allowed me to scan an image at 12800 dpi. I really doubt if it’s real. It’s basically 40+ times larger than the originally image! I am already doubting it when it says 1500 dpi… So my question is: Is 12800 dpi, or 2400, or 1500 a real thing? Do you images really enlarge 5 times with the 1500 dpi option and still looks sharp? And how about when it’s printed? Can anyone advise me the minimum size my work should be in order to get a high-res enough digital image for printing 6 ft by 6 ft? And I don’t want to make it a vector. Thank you in advance!
Large-format printing does not need to be 300ppi. The viewing distance of most posters is measured in meters, not centimeters. Unlike a brochure or magazine, posters aren’t viewed at arms length, so they don’t need to be razor sharp from that distance. Instead, think in terms of keeping the imagery sharp from the typical viewing distance. In other words, you can probably get by with 150ppi or less.
Besides, if your original illustration is much smaller than the enlargement will be, it will be a bit blurry anyway. An ultra-high-resolution scan will only serve to make the texture of the paper or illustration board visible, and I doubt you want that.
As for any text on the poster, that really should be done in a vector format. You can get by with the illustration not being razor sharp, but blurry text always comes across as noticeably bad.
Thank you so much! It will be put high up on a wall, probably 2 meters above the ground. What do you think if I make a 2ft x 2ft illustration and scan it at 600 ppi? Or even 50cm x 50cm (19in x 19in)? I don’t know
And what do you mean by “it will be a bit blurry anyway?” Isn’t a high-res image supposed to be crystal clear? I would like to have the paper texture show a little bit, but not too much I guess.
Thank you for your note on text. I will definitely make it vector.
What I meant is that if your original illustration is considerably smaller than your printed poster, the small flaws, inconsistencies, brush strokes, pencil marks, paper textures, etc., that aren’t noticeable on the original will be blown up to noticeable size on the finished piece if scanned at an ultra-high resolution and enlarged.
I don’t know what you have in mind, and I don’t know what your illustration will look like. But I’m assuming that these are details that won’t be seen from the typical viewing distance and aren’t critical elements for the poster to contain. So if that’s the case, there’s no reason for a very high-resolution scan that would make them readily visible in sharp detail when printed.
As long as your original scan has sufficient resolution to enlarge what’s scanned (without resampling upwards) to a file that’s around 150 ppi, you’ll probably be fine. In other words, if the original scan is, say, 1200 ppi, then when you enlarge it, it weighs in at 150 ppi or so (maybe even less), it’s probably good.
As Just-B said, your art doesn’t have to be 300 dpi for large format printing – especially if it’s going to be installed 2 meters above ground. You should be able to get away with 100 dpi. If scanning doesn’t work, you can look into having the illustration photographed.
I suppose it’s both, but the main point is there’s no particular reason to scan that level of small detail. Your illustration, I assume, will be created and sized to be seen from a typical viewing distance — not examined under a microscope.
From a practical standpoint, a 300 ppi image at the size you mentioned would be over a gigabyte, which is huge. Not only would it be difficult to work with, it would be a beast to output.
The next time you’re in, say, an exhibition hall or, maybe, at a covered bus stop, look at the photos and ads that have been blown up to the size you’re thinking about. You’ll see that up close, they’re not sharp at all, but from a few feet away, they look just fine.
And speaking of psychological issues, while you’re doing that, think about how you’ve never noticed before that these kinds of images weren’t razor sharp when seen up close. There’s something about human cognition that seems to ignore missing detail when images are blown up larger than they are in real life.
How are you planning on scanning a large image with your scanner? Are you going to be able to reach all the image without folding it?
When we hire Illustrators, we have to keep in mind how we are getting their art scanned. Since all of the really large format flatbed scanners are pretty much gone (anything over 11x17,) and artists sometimes work in a medium that we cannot feed through a large document scanner (not that great a scan quality anyway,) we contract with a photographer who uses a very high resolution stationary scanback camera. We used to use 4" color chrome film and drum scan that, but that is pretty much dead too. The largest art our photog can do in one shot is about 36" x 36". He can do larger, but uses a custom stitching algorithm to do it (the name escapes me at the moment, but it isn’t photoshop.)
B’s and Steve’s advice is spot on. For something this size at the viewing distance you noted, 100ppi is definitely adequate.
Please do not forget your image bleed! When large prints are created, it is not an exact science as far as size is concerned. For something this size, I’d recommend at least 5cm all around for trimming and finishing. Your mileage may vary with that however, depending on how you are finishing this piece. For instance, 5cm would be enough for a standard pole pocket banner where the back is not seen, but if you are wrapping a frame to look like an art canvas and the edges are visible, your bleed has to also include the return distance of your frame. If the return depth is 10cm, your bleed would be 10+5 all around.
Keep any critical imagery/text out of this bleed/return area - and allow about the same amount of space inside your finished dimensions for a Safety as well, so no important imagery/text gets cut off. At 1.8 meters you can expect your print to be out of square +/- 1.5cm depending on what media you are using and the method of printing. Allow for some image to be trimmed.
The larger an image is printed, the more bleed you will need. It’s always best to discuss with your print vendor what they need for finish bleed. Think finishing before beginning.
Thank you, B and PrintDriver. It’s a relief to know that 100 ppi is sufficient, so I can work small, and the deadline is pretty tight… I always wonder how they make full bleed photos work for those gigantic ads you see several hundred feet or meters away, and, like B says, the file size would be crazy. Usually I just conclude that they have an extremely powerful camera, and probably an expensive computer, too.
To PrintDriver, I just gonna scan bit by bit which will take forever if I am to do it. It’s not even a 11x17 scanner. The lid of my scanner can be made to lay parallel to the glass, so I don’t need to fold anything. I just need a couple books to sit on the paper when I scan. It will probably take forever to put them together into one piece in Photoshop, too. So it’s really a relief when you guys told me that I could do it in low-res. I am a freelancer so I wouldn’t have anyone to photograph my piece.
Thank you for the bleed reminder. Yes I will probably reserve 5 or 6 cm anyway. There will be a frame but it won’t touch the print (which will be a canvas or plastic cloth). They are punching holes around the edges of the piece and tie it to the frame.
Are you a illustraion rep? I am curious how do you get to photograph their works since they are probably not living in the same city as yours? And doesn’t everyone make their own digital images nowadays and upload them to the website or email them to clients?
I’m a buyer, not a rep.
We commission art for various things. The illustrators we work with are mostly local and either they or I bring their stuff to a place in Boston to be shot. If the illustrator is out of town, they either make their own arrangements with a photographer in their area (most illustrators will have a local resource for that kind of thing,) or I find one for them. Or they package up the art and overnight Fedex it to us (insured.) Remember, this is commercial art, not museum pieces. It isn’t worth any more than the time to do it over if it gets lost in the mail. The illustrators we use are very fast at what they do.
We used to always shoot to large format (4") color chrome, then drum scan the film. Sadly, almost all the drumscanners are dead. I have one vendor left that still has one, and occasionally run into a photographer that has film for scanning. We don’t just use stock art off the internet. I have a few contacts who still like to use chrome. They do their own scanning or they send me a copy to do my own.
You aren’t going to email imagery at the size we need. FTP more likely. Dropbox is handy if both ends are connected. Occasionally we’ll get a thumb drive. As for making their own digital files, most prefer to get them professionally scanned by a service bureau rather than resort to stitching an 8.5 x 11 pile of pieces together. A scanner glass is not flat. It is inset into a frame of some sort. You are going to have to make sure you don’t get edge distortion where the art rides up over the lip. You might also get lighting aberrations if the scan isn’t done in the same direction each time. There is a light bar involved in scanning and if it doesn’t hit your art (or your paper) at the same angle for each piece, you could find yourself with a mess.
You mentioned large billboard prints. Those files are set up at 1:10 at 300ppi. That means you are working in 1/10th scale and the final print outputs at 30ppi. Not only that, they are printed at “production speed” (in other words, pretty darn fast.) If you could see one up close, you’d actually be able to see the ink droplets. But not when viewed at 100 feet at 60mph.
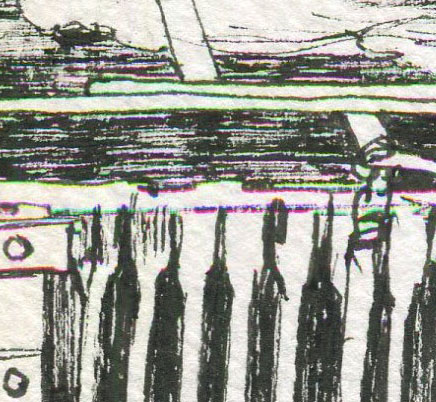
So this is a part of a scan of my drawing from last year. It’s a black and white piece but there are this purple/green/yellow colors in certain areas of the digital image. This is a jpeg but the same has happened in a tiff, too. Can you please tell me why is this happening and how can I avoid it?
How enlarged is that image (is it actual size or a scoped in crop made larger?)
What scanner are you using?
What profile are you using when scanning?
What file format are you saving to directly from the scanner (and how many bits)?
What kind of ink are you using?
On what kind of paper?
The image is 300ppi. I save a crop of the image zoomed in 100% from Photoshop.
My scanner is Epson Perfection V370 Photo.
24-bit color, jpeg; The profile is EPSON sRGB I believe. I found the info in “Assign Profile” in Photoshop; it also says sRGB from the setting options of the scanner.
Pen: It’s just one of those pens for drawing:
It says “Pigmented Ink,” “Water-proof,” “Photo Safe,” etc.
Paper is Canson 140lb watercolor paper
Thanks!
We call it a chroma shift here (though that more applies to output issues of the same nature when printing to laser exposed film.)
Short answer, I don’t have one tried and true answer for this. I don’t normally see it in scans. Just in output.
Try using any other RGB profile that is not sRGB. ProPhoto RGB is best if your scanner has it. Adobe RGB is the next best bet. sRGB is a much smaller color gamut that simulates the CMYK gamut. Something may be going on in the conversion there (though usually not with B&W imagery)
Do not save to jpg. jpg is a lossy format and it tosses data. You said you had the same results with a tif though, so… I’m not sure, unless you are using compression on the tifs? Turn off any tif compression.
Do you see this in all scans on the same paper? Looks like it has a fairly hefty tooth to it. Does this appear in plain paper scans?
I’m still curious about the ink. This looks to be a leading/following edge problem in the direction of the scanner travel. Not sure what the scanner is seeing there that might flash red or green.
Sometimes turning the image paper 45° or 90° will work, if it still fits on the scanner that way. Sometimes that is not an option. Would be something to try as an experiment though.
The scanner specs say it only has 16-bit grayscale depth, so maybe you are getting some weirdness there too.
There is always the option to scan to grayscale, but I don’t personally like doing that. It makes depth corrections tough to do sometimes.
To an earlier question, your scanner has a max optical resolution of 4800ppi. Anything over that is interpolated.
My sister has an Epson V600 scanner. It has a maximum dpi 12800×12800, which allows enlargements up to 17 x 22 inches. Such huge enlargement is well suited for artwork. You can quickly scan the biggest paintings of yours. However, the speed depends on the configuration of the computer that you use. She is using a laptop with an Intel i7 processor, 8 GB ram, and Nvidia 2 Gb graphics as was it was closest to what most of the artists use today. The result we got was amazing. The colors were exactly like the original artwork. It can capture even the smallest details.
That Epson is a $200 home desktop unit with an 8.5" x 11" scanning bed. Hardly large enough to scan large art.
It’s actual optical resolution is 6400x9600.
The “maximum” resolution is obtained through interpolation. It’s a crap spec and should be ignored when buying a scanner. The killer spec is always the step resolution (6400 in this case) That’s the motor driven scan function. The higher spec is usually the line resolution.
The Epson is a fairly good unit. They always have been. I’ve used them in the past.
Right now I have a Canon with a light lid though cuz we still do chrome scans on occasion and it’s perfectly fine for small output sizes. For large output stuff, chromes go to a vendor that still has a drum scanner.
A major problem with flatbed scanning art…well two problems really:
1- you have to place the art face down on the glass. That can damage the art
2- the light used for the scanning has an angle to it and can cause all kinds of bad reflections when scanning any art with any kind of texture or ‘tooth.’ And don’t get me started on the imperfections of media on any textured surface. White voids you can’t see on, let’s say, an oil painting held in your hand ,become starkly obvious when enlarged even to a small extent.
For artwork larger than the scanning bed of any desktop scanner, we used to take it to a photography studio that had a Cruize scanner (a large flatbed scanner.) Now we take it to an art photographer who has a dslr with a scanback attachment. For really large art, he also has stitching software that motion controls the camera and seamlessly composites the image together. He has all the right lighting and color control needed to do fine art prints justice. Tech has come sooooo far in the last 10 years, it’s scary. Doing this isn’t all that pricey either. But it ain’t cheap.