In Photoshop when you add a stroke to a font using the layer styles, the stroke is rounded and forms nicely around the letters, however it is pixelated.
In illustrator when you add a stroke to a font the stroke is pointy and rigid, and eventually takes over the letters of the font to where you cannot see them.
Does anyone know a way to replicate the Photoshop layer style stroke in Illustrator? Or a way in Photoshop that if I were to add a stroke above 30, it would not be so pixelated?
I don’t know what you mean by the stroke being pixelated. Unlike Illustrator, a Photoshop image is composed of pixels, so your stroke will be composed of pixels at whatever resolution your image happens to be.
As for your other questions, I’m not totally sure what you’re asking. In Illustrator and Photoshop, there are options for positioning the stroke inside the outline of the object, centered on the outline or outside the outline of the object being stroked. In Illustrator, there’s also a rounded corner option, if that’s what you want. Again though, I’m not totally sure what you’re asking.
Like B, I’m not sure I fully understand all your problems with Illustrator’s stroke application, compared to Photoshop’s Layer Style method (which isn’t ‘object based,’ but rather just surrounds all non-transparent pixels on the target layer with the stroke color and width you choose).
In case you’ve never encountered this, one thing that improves the look of an Illustrator stroke applied to text is the present-day equivalent of an old trick. The old trick is to apply the stroke to your text, then paste a copy of the text directly in front, un-stroked, visually preserving the integrity of the font by covering up the encroaching portion of the stroke. These days you can do effectively the same thing just by rearranging the fill and stroke in the Appearance panel so that the fill is on top. (On top in the panel = in front on the artboard.) The benefit is that you don’t have to manage or future-edit 2 text objects.
I have tried the copy trick but it hasn’t worked because I am making the stroke too large. What I am going for is I want the text to look similar to a dye-cut (I think that’s the term?) sticker, where there is a thick white outline forming around the text.
When adding a stroke to a text layer in Photoshop using layer styles, this effect can be achieved, however it has the aforementioned pixelated problem.
I was able to get something close to what I am looking for in Illustrator by using effect > path > offset path. And then placing a copy of the text over the offset path. So far that is the only way I can quickly get that “sticker dye-cut look” I’m looking for.
If you’re working with type, stokes, and outlines; Illustrator is the tool you want to be using. One tip that might help you is to keep the original set of letters in tact, duplicate that original set, send to back and edit the newly created set. If you want to post screen captures of your problem, that is helpful.
@calebninja I know what you are describing, here’s how to do it. First, you need to do it in illustrator, not photoshop. Once you’ve made it in illy, you can change it to outlines and copy/paste into your PS document.
In illy use the text tool to type your text in the font you want.
Now you have two choices that will change the next steps. Both will give you final result you want. One will be editable in illy afterwards, one will not.
2 a. Editable text
Select your text. Copy it, and paste the new text directly above. (CTRL-C then CTRL-F)
Select the text in the background. Choose your Fill Colour, and your Stroke colour. If I understand you correctly, you want the outline to be white. NOTE: At this point when you make your stroke colour white, you won’t really be able to see it, since the background of your workspace is likely white. I recommend making your Stroke colour something highly visible (like Red) until you have it the way you want it, and then change to white.
Open the Stroke palette, and change the weight of the stroke until you are happy with how “wide” it is. When the weight starts to get thick, you will start to see the jagged points around the letters you described, so here’s the trick.
In the Stroke palette, you will see options for “Corner”. Choose the second button (hover and it says “Round Join”). Now your “pointies” and “jaggies” will go away, and your sharp corners become rounded.
After you are finished, this text will still be editable, but you have two objects, so make sure to group them before you Copy/Paste, or convert to outlines. Of course, once you convert to outlines you can’t edit the text any more.
2 b. Outlined Text - This method results in only one object, but you won’t be able to edit the text once you outline it.
Select your text and convert to Outlines.
Choose a fill colour and a stroke colour. As in the instructions for 2a you might want to make your stroke colour a bright colour until you are finished, and then change to white.
From the Stroke palette, from the Align Stroke options, choose Align Stroke to Outside (third option).
Change the weight of the stroke until it is as thick as you like. You will NOT need to select rounded corners unless you want them to be rounded. You will have nice, straight/sharp corners, but no jaggies. If you want the rounded corners, choose that option in the stroke palette.
You’re done, but won’t be able to edit the text.
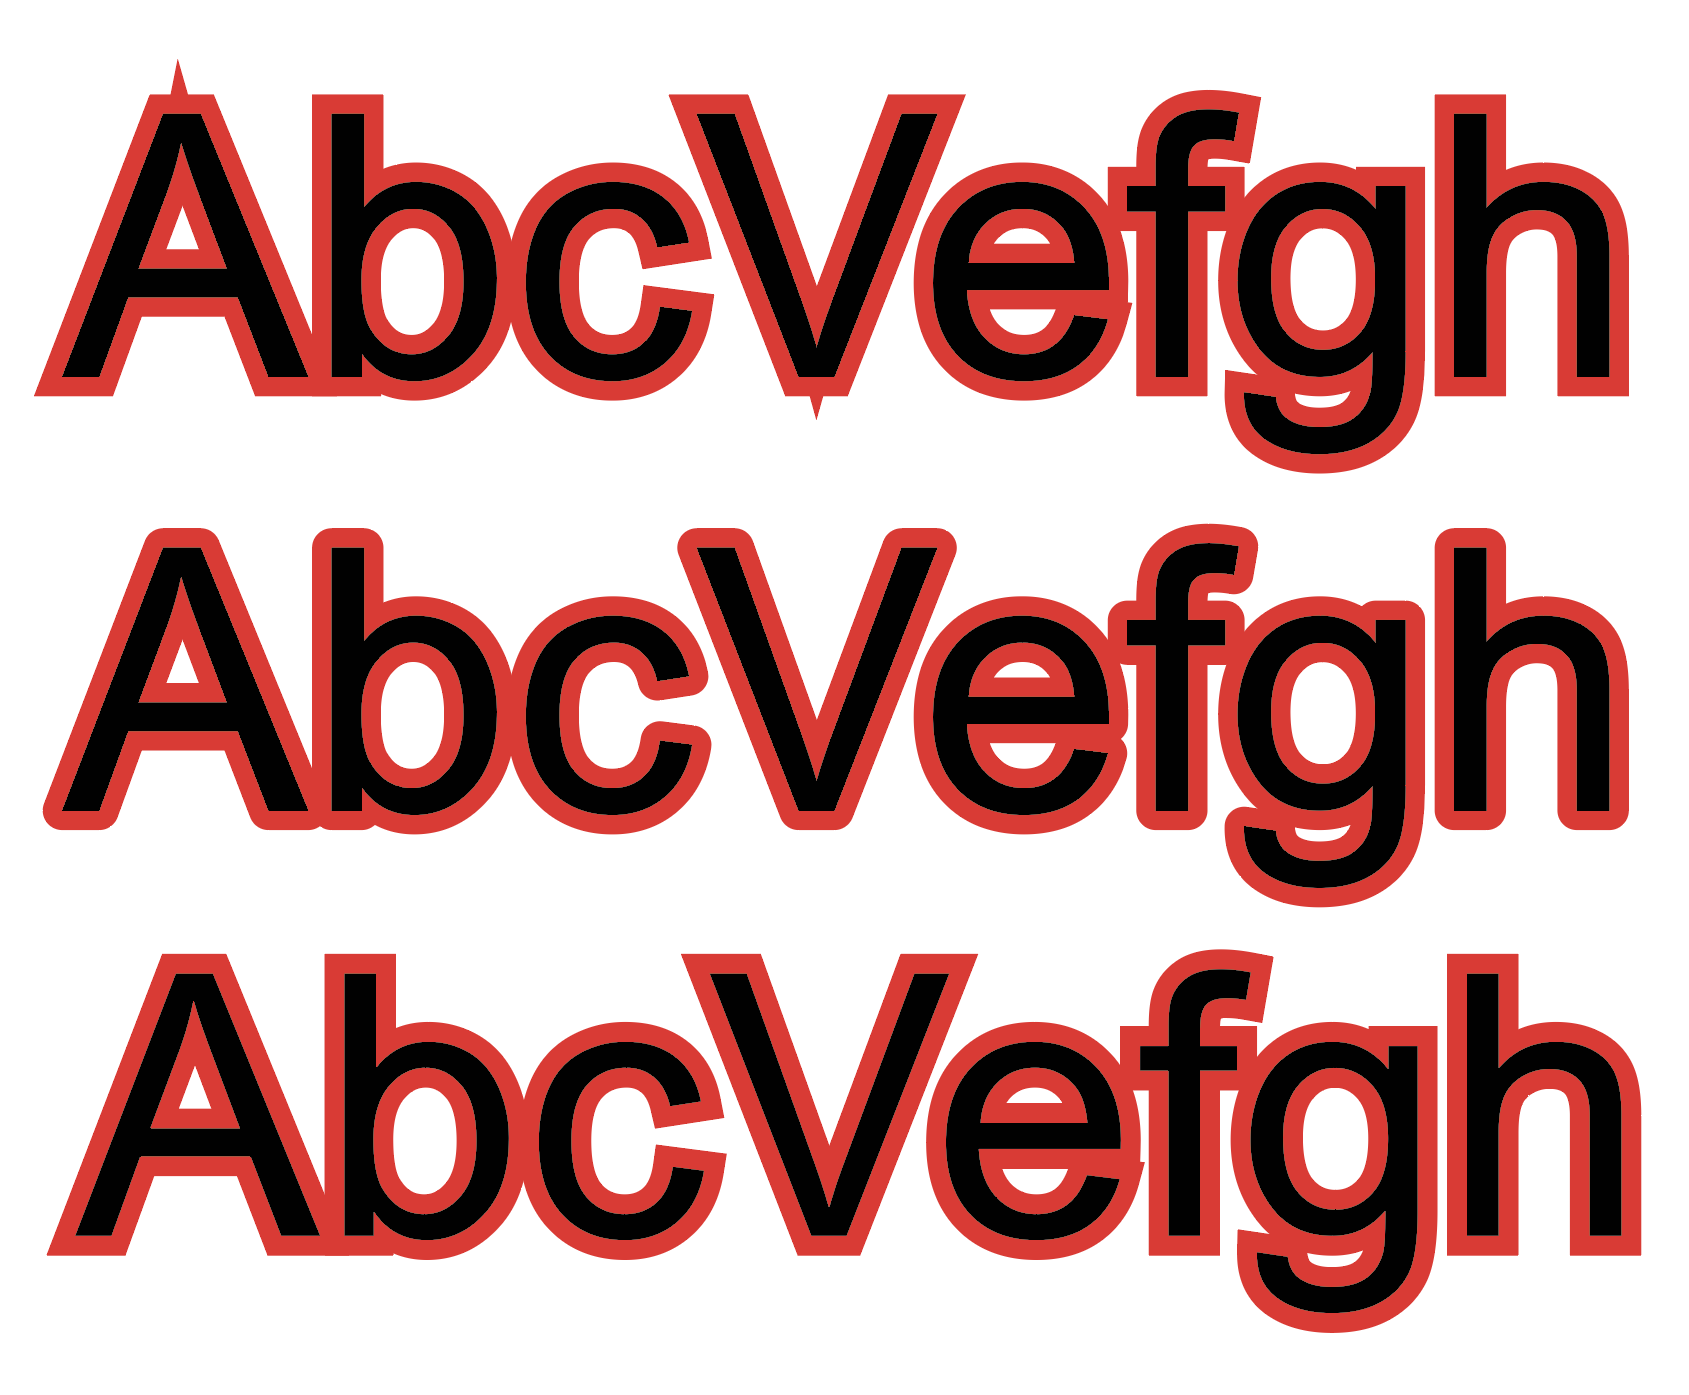
Here are the results you should see. Before is with the sharp edges and jaggies. After is option 2a and then option 2b.
Not to be a jerk about this, but I would not use the method Crow Pebble mentions above. I’ve posted in several threads here on GDF about this already, but use the Appearance Palette in Illustrator. Everything will be live and editable in the future. You can change the font, change the text, et.c and the effect will remain.
I cannot stress how useful the appearance palette is and most designers seem to not even realize it exists or realize its potential. The other nice route with the appearance palette is if you create an effect that you lie, you can save it as a graphic style and apply it to other text or other shapes moving forward.
I’m one of those who have ignored it because it’s just not immediately intuitive, and I’ve always found another way to do what I’ve wanted. After some of your previous posts about its usefulness, however, I decided to dive into it. That decision was at least two months ago, and I still haven’t done it. Thanks for reminding us (especially me).
I think once you use it a little you realize how intuitive it is. And the beauty is, since it’s all in the appearance palette if you don’t like how it looks, you can go back and modify it.
Another way to wrap your head around it and familiarize yourself with it, is any of the default graphic styles in Illustrator have used the appearance palette. Apply any graphic style and look at how it’s “built” in the appearance palette.
As with all the tools in Illustrator that create “live” effects, if your end use is a logo or some other form of identity mark that will be handed off to printers/sign makers, please expand and clean up the artwork. You don’t want to be sending live fonts for such things and you don’t want to be paying the sign guy to clean up the artwork.
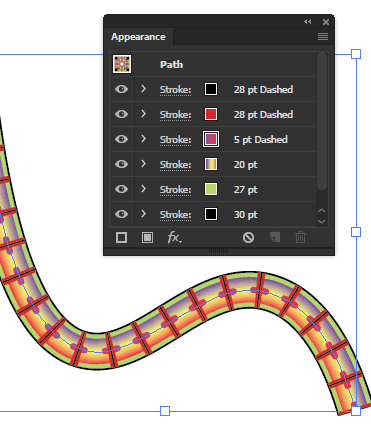
My first infatuation with it came about after reading a forum thread about making realistic looking roads on a map/directory of some park or campus—the kind that looks like an illustrated aerial view. A respondent demonstrated how it could be done by using the Appearance panel to stack up strokes of varied color and weight on a single path.
When you really consider the power of being able to manipulate all that as a single path, the value of the feature balloons. Just to demonstrate the more abstract possibilities, here’s a much sillier example:
I would suggest straight edges along the top and bottom, instead of having the “divots” from the letters repeated in that outline. And he S is throwing me off a bit because the tail almost touches the 'E" at an odd angle.
Thanks for the suggestion. I’ll keep it in mind about the shape following the letters. This was simply a test to demonstrate the look I was going for so it will look different based on what combination of letters I use.
OK thanks, I thought as much. Looks good perhaps a more aggressive gesture but that all depends on it’s targeted audience.
I too have a graphic that is going to die-cut but with a ton more gesture which is a lot tighter to the cursive lettering. With mine I want the letter strokes to be more prominent so to accomplish that the outline is of less ‘weight’ than most of the letter strokes thicknesses.
Tuff to know when to say when … depends on target audience and personal style.