In InDesign, when you Option+drag to make a copy of an object, the X and Y values become the default values in Step + Repeat.
1 Like
Yes, they are captured for that, and for Transform Again.
I’m learning graphic design from the couple of months by help of UDEMY & YOUTUBE as well and learned more than my expectation but about 3D design tricks, I learned accidentally, How make a 3D object like a pro with easy steps.
1 Like
Horizontal Scrolling - this works in InDesign, PhotoShop and (for some reason reversed direction) Illustrator. Simply hold down the Option key (Windows key on PC) when scrolling.
To zoom in / out with scroll hold down the Command key (Alt key on PC).
this reminded me of the MacOS shortcut for zooming in/out across the OS… which is Cmd Option + or -
You can make amazing kaleidoscopic patterns in Photoshop with the help of a keyboard shortcut. Cmd/Ctrl+Shift+Alt+T lets you duplicate a layer and repeat a transformation in one go. First, make an initial rotation by pressing Cmd/Ctrl+T and turning slightly, then hit Enter to apply. Next, press Cmd/Ctrl+Shift+Alt+T repeatedly to create a pattern.
Ad Link Removed**
1 Like
so I have a trick I’m trying to figure out. I read an article about a designer who forced themselves to learn the hotkeys for working in Illustrator and I was curious how you set a text path using keyboard shortcuts if it’s possible.
Well, “learning the hotkeys” is very useful, but don’t interpret that as though it implies you can operate every feature using only the keyboard.
Can you clarify what exactly you mean by:
?
To set text on a path, you’d need to draw the path. While you can make all the tool selections and so forth, you can’t really “draw” with only the keyboard; nor can you perform the requisite click to set a live insertion point with the Type on a Path tool.
In Indesign and Illustrator, Space+period will give your selected shape a white to black gradient fill (or stroke depending on which is active.) Not particularly helpful but just in case you’ve wondered where it came from.
The other common keyboard mistake is wondering where all you control handles and text highlighting went. Hitting command+H instead of command+G for group will make all your bounding boxes invisible. To fix, hit Command+H again.
The text flattening thing Obsidian wrote above doesn’t always work on outlined fonts (ie strokes but no fills. Be sure to check your letter shapes don’t go wonky or grow horns. Same holds true for placing a PDF in Illustrator and telling it to flatten transparency (which is a two-step process to Obsidian’s post, but only works with PDFs, and sometimes Illustrator files with the PDF save option turned on.)
1 Like
So yeah, I was trying to figure out how you’d perform the requisite click to set a live insertion point but when messing with my mouse sensitivity settings I found the section for Windows 10 where you can control the mouse with the keyboard so I assume it’s control + directional keys but I didn’t go too much into it other than noting the settings were there.
Maybe record an action of placing a text path, and assign the action to a shortcut key?
Amazing!! Very new and cool stuff for me will definitely practice this.
As I am new in Photoshop, I didn’t knew about that one before.
I think this trick will help me a lot.
When an illustrator file gets very cluttered and I want to modify a single object I mark all (cmd+a) deselect the object I want to work with with shift+clicking it and then lock all the other items (cmd+2). When I’m done editing it I unlock everything with alt+cmd+2 and can continue working.
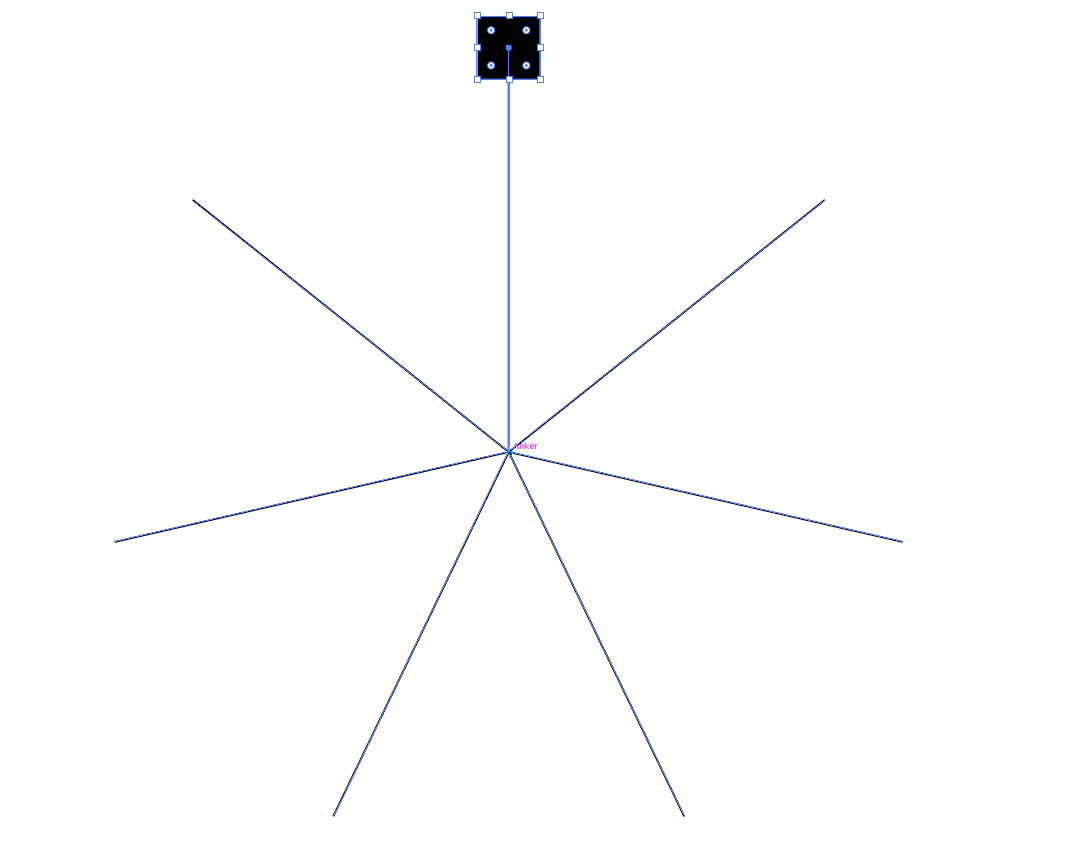
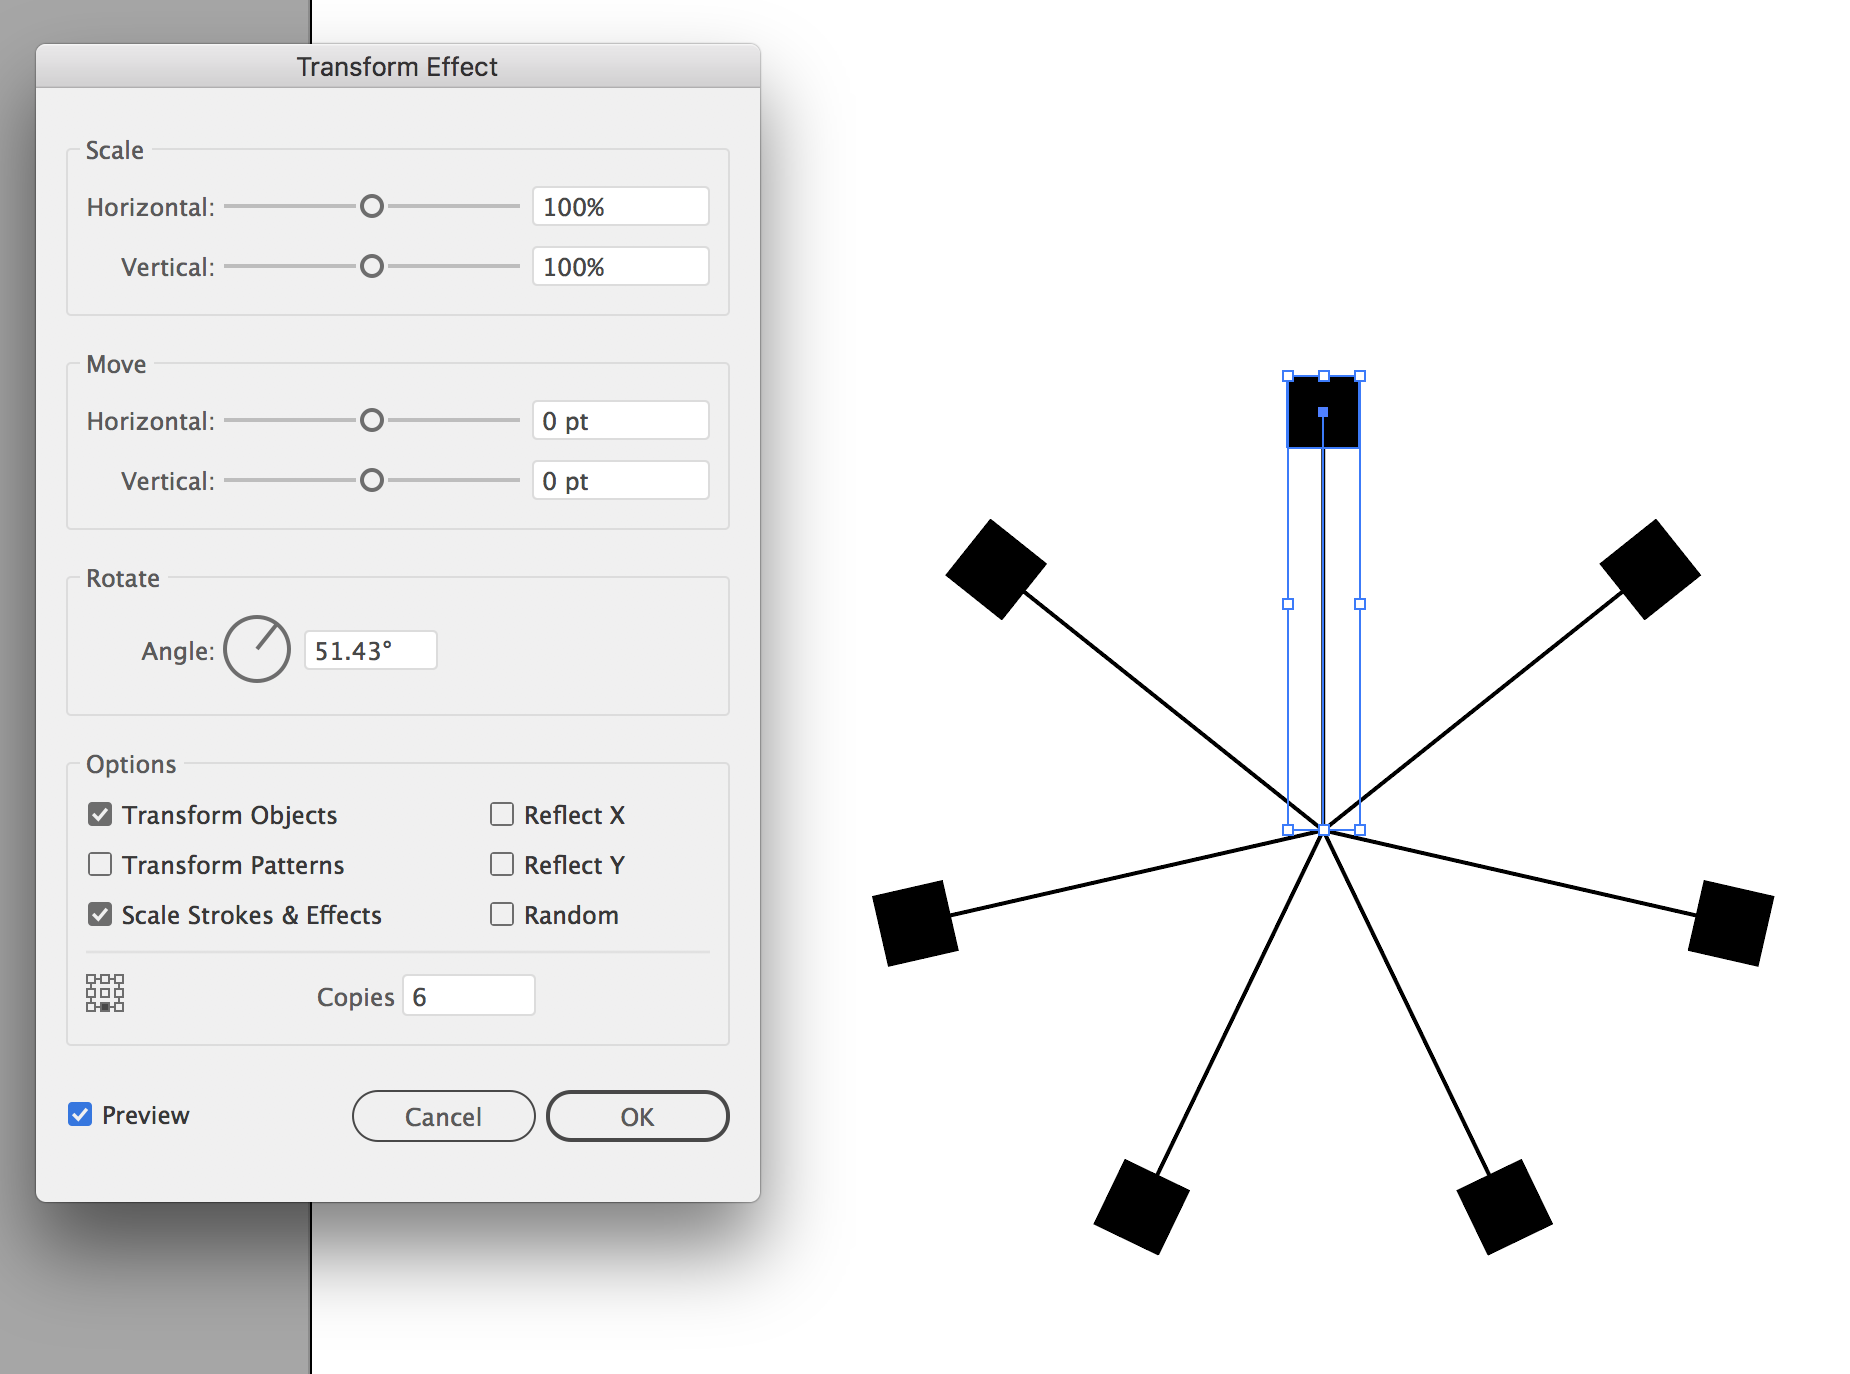
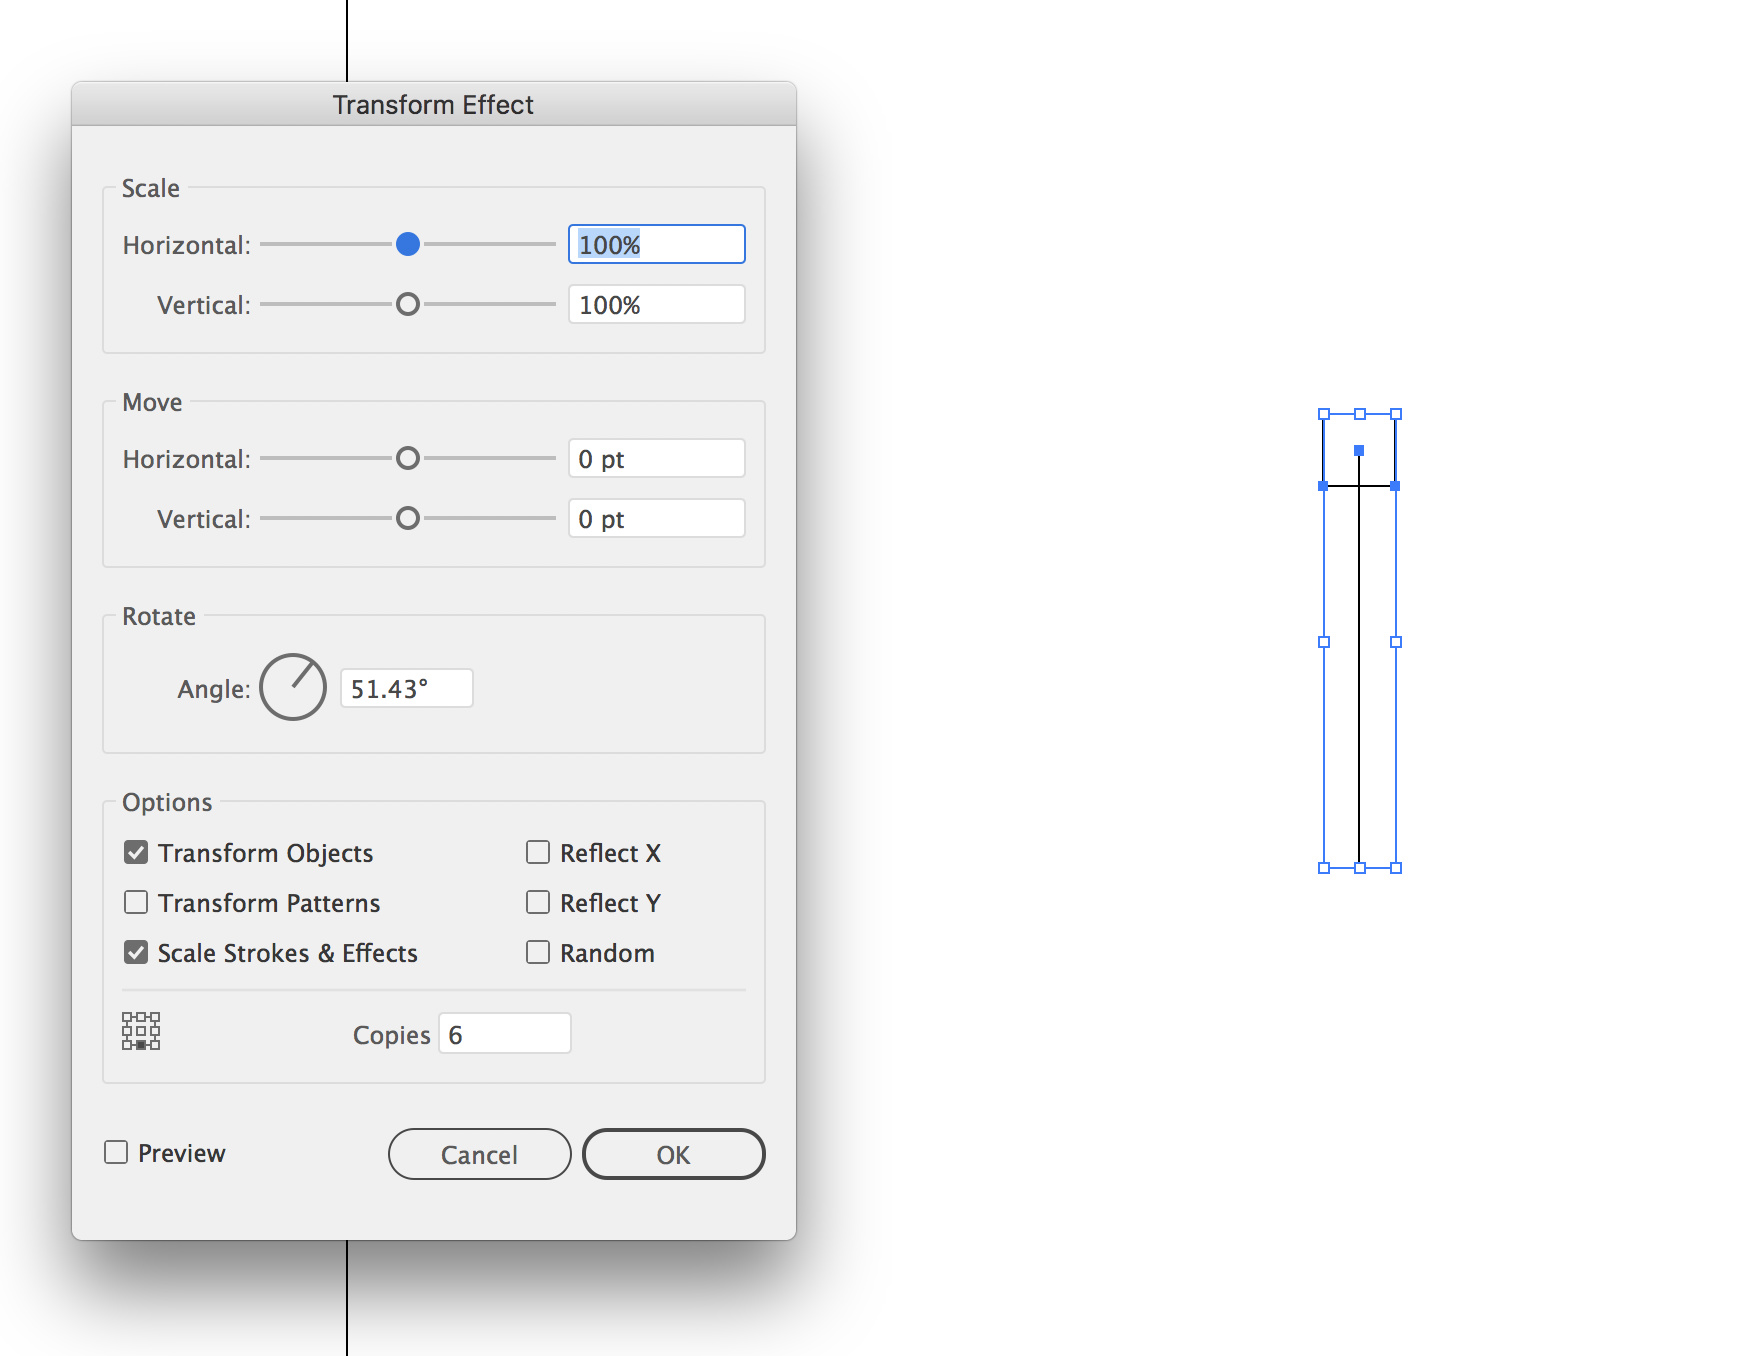
Another neat illustrator trick when I want to rotate objects around a centerpoint a number of times undividable by 4 is to make a star object with the desired number of corners and set one of the radi to 0. you can then use the center to place your rotation point and the resulting lines as guides.

2 Likes
you can also easily replicate that using the appearance palette by drawing one line and one box. Group them and in the appearance palette apply a distort and transform effect. That way if you change one “spoke” they all change.
3 Likes
YOU ARE MY HERO! I was looking for that option for since I switched from Freehand to Illustrator! Thank you!
no problem. To get the right angle, in this case to rotate it 7 times, I typed 360/7 in the angle field and let Illustrator do the math for me. Then the other “trick” is to remember if you need 7 “spokes”, you already have one, so the number of copies is one less than what your finished count it. Just remember to expand to finalize it, but keep an editable version around as well.
3 Likes
A reflection followed by a question:
Is there a way to edit the text of an image or a PSD or other format on Photoshop?
Is this possible when the image or file is flattened
I’m looking for a method to no longer need to use a tool to clear an old text that was on an image and then write a new text…
You cannot alter text in a flattened Photoshop file. At least not unless you are reeeeeally good with the clone tool and the image makes it easy to do.
If you anticipate changing text in an image, a layout program such as InDesign, or Illustrator may be in order. Place the photo in either of those and do the text over the photo. Remember though, Illustrator is NOT a multi-page layout tool. If you anticipate more than one front and one back, use Indesign.
1 Like
I saw this on an old InDesign Secrets blog by Mike Rankin. Credit where it’s due, this is gold.
Customise Placeholder text - Lorem Ipsum is OK but can get old. Simply place a .txt file in your InDesign folder called ‘Placeholder.txt’. It can be anything you like. You don’t even need to restart InDesign.
When you need Lorem Ipsum back, just remove the file (or rename it) from the InDesign folder.
https://indesignsecrets.com/tip-of-the-week-upgrade-your-placeholder-text.php
1 Like