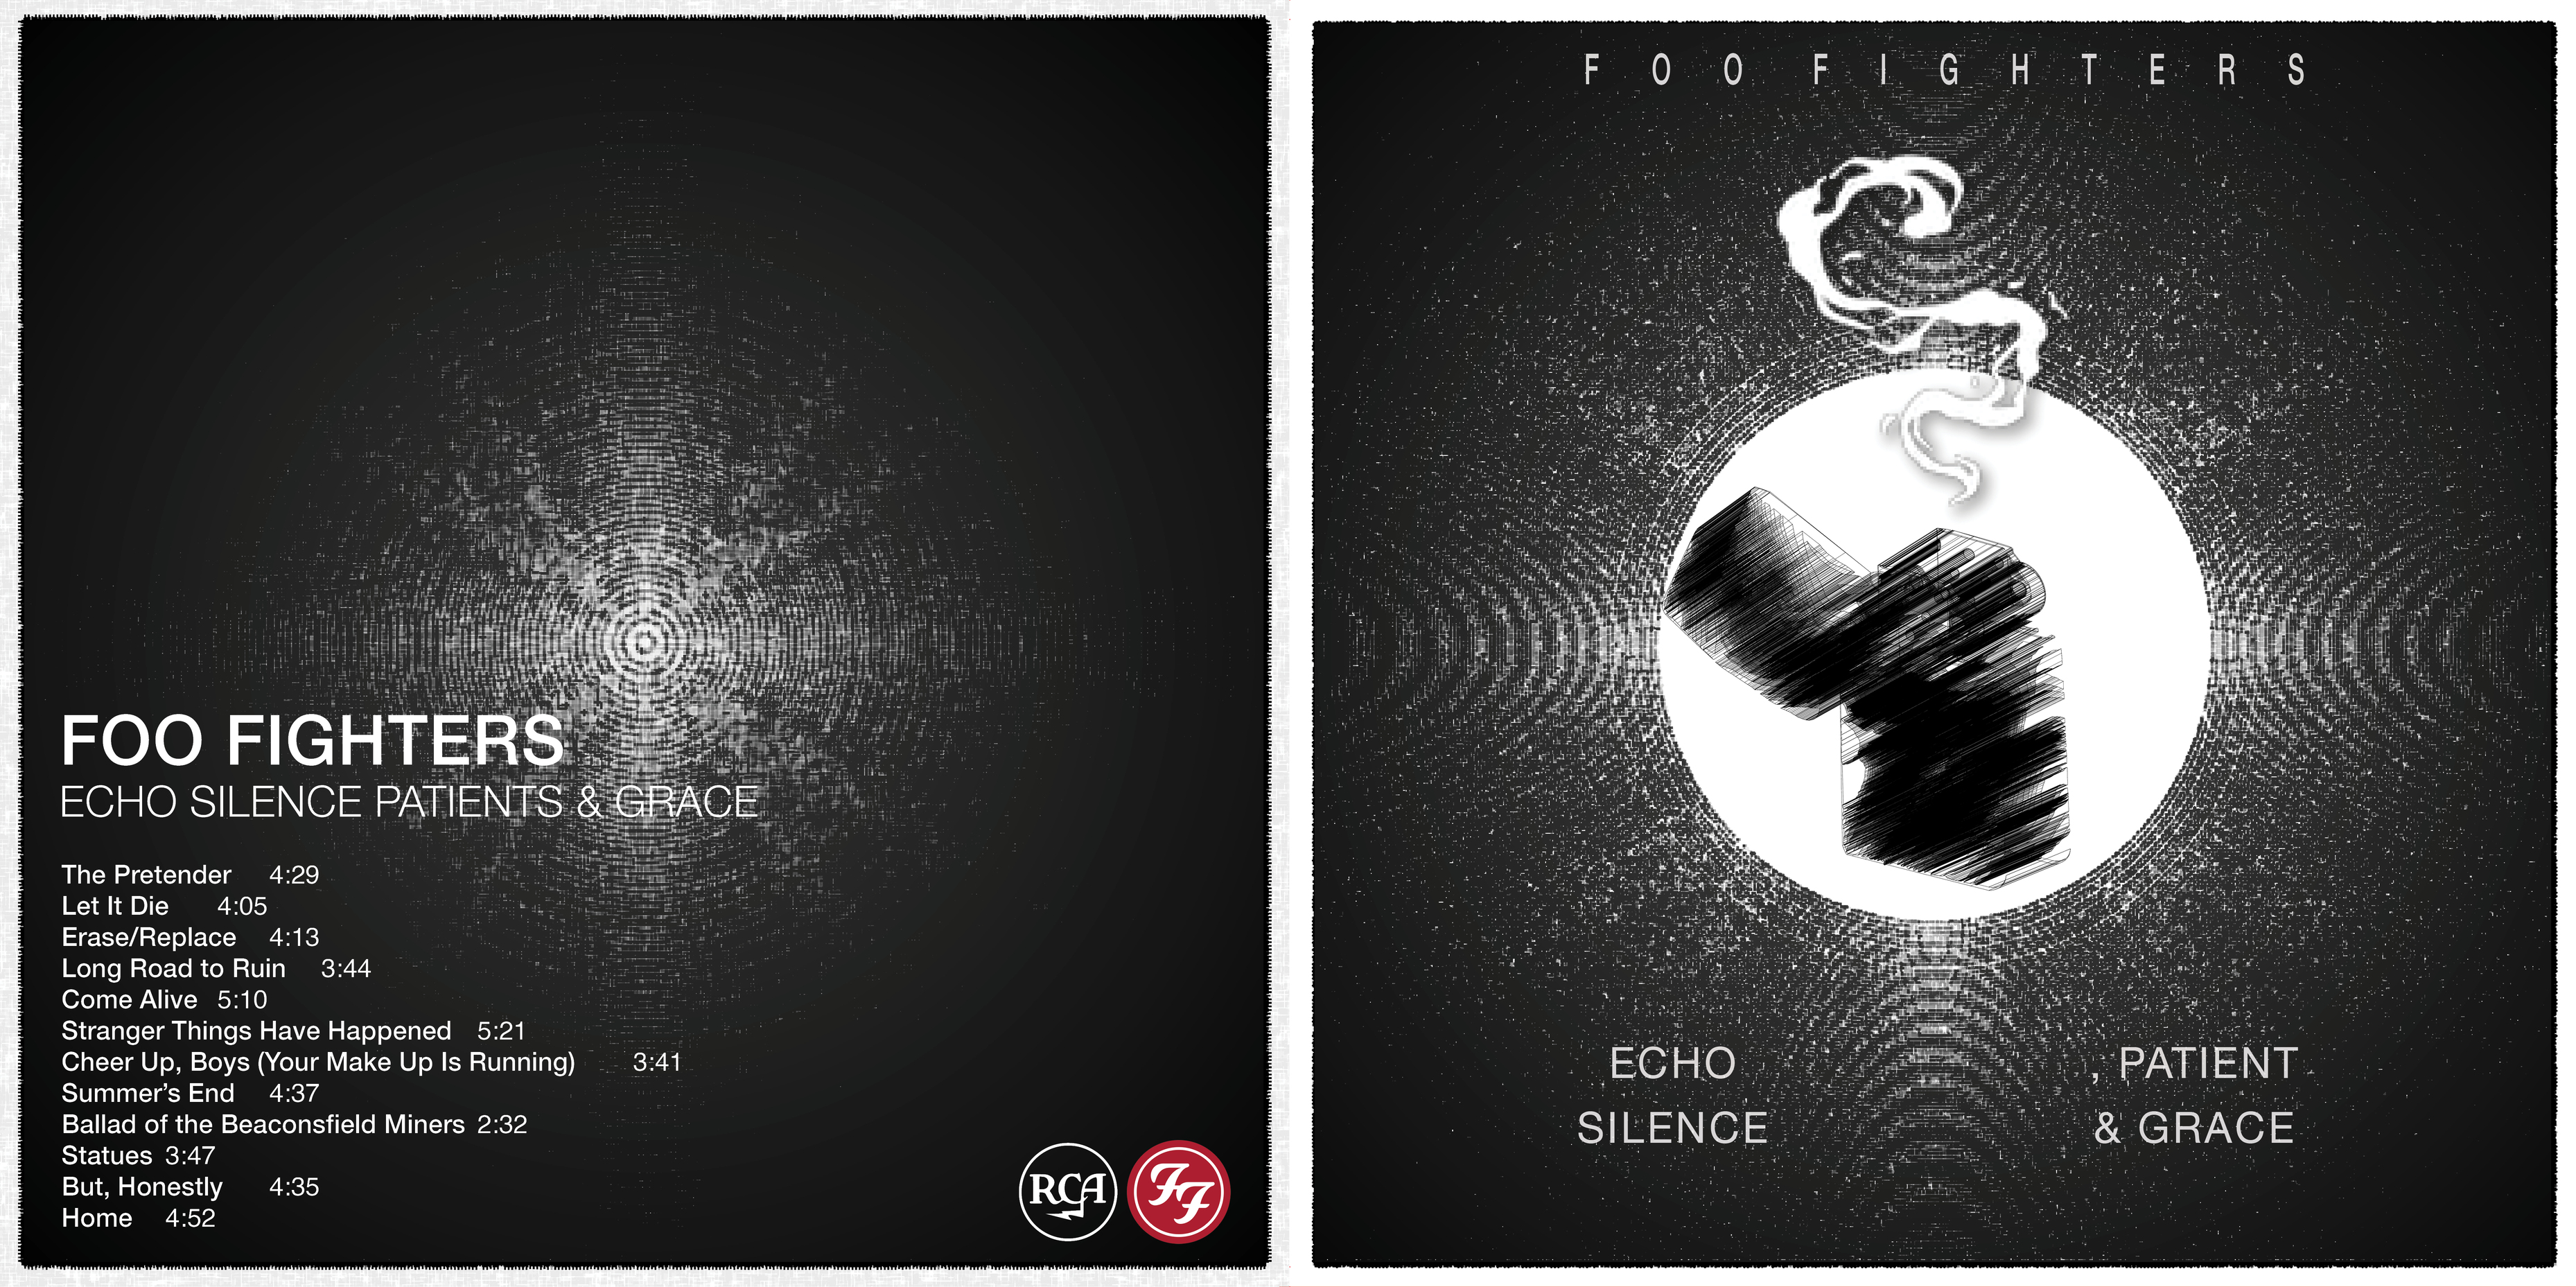
Concept : From what I researched about the Foo Fighters and this album was that the concept behind the album was based on mortality and life. The piece in the middle is a distorted 3 dimensional lighter with some smoke coming out of it. The concept behind my artwork was basically the fire burns till it runs out of gas. Black and white color scheme to represent life and death.
Purpose or Goal : The work is a student project for my packaging design class. Since everything is online right now the class isn’t very in depth as I wish I learned more about printing, paper ect. Research was done on the Foo Fighters Audience and then the cover was designed. We won’t actually be printing these even though we probably would of if class was still in session.
Format : This was designed for print. I planned on printing on 250 gsm cover stock. Single Jacket Vinyl Package. With a Matte Varnish.
Audience : The audience was pretty wide for Foo Fighters 16-50 male and female. Most fan based in English speaking countries, but also has a big base in Latino counties. Median to high income.
Your Experience Level : Student
Nature of Job: Student Work
Big questions about this would be:
Would the graphic print well. I have lots of fine detail and wanted to use rich black. I’ve heard that using rich black with white may cause some of the CMYK colors to show up in the white areas?
Constructive criticisms to improve my design? Areas that I have to improve upon?
Ok, to start, it’s “patience” not patients or patient…
Second, this is the actual quote about the album from the creator:
Most people think the world begins with their birth and ends with their death, but at some point your realise there’s a much larger world out there that will continue existing long after you have made your exit. So I started to take in the big picture, and these realisations had an influence on the new album. There are songs about birth, death and life because my perception of these things has changed radically."—Dave Grohl, on the album’s lyrics
That’s a little different from your interpretation.
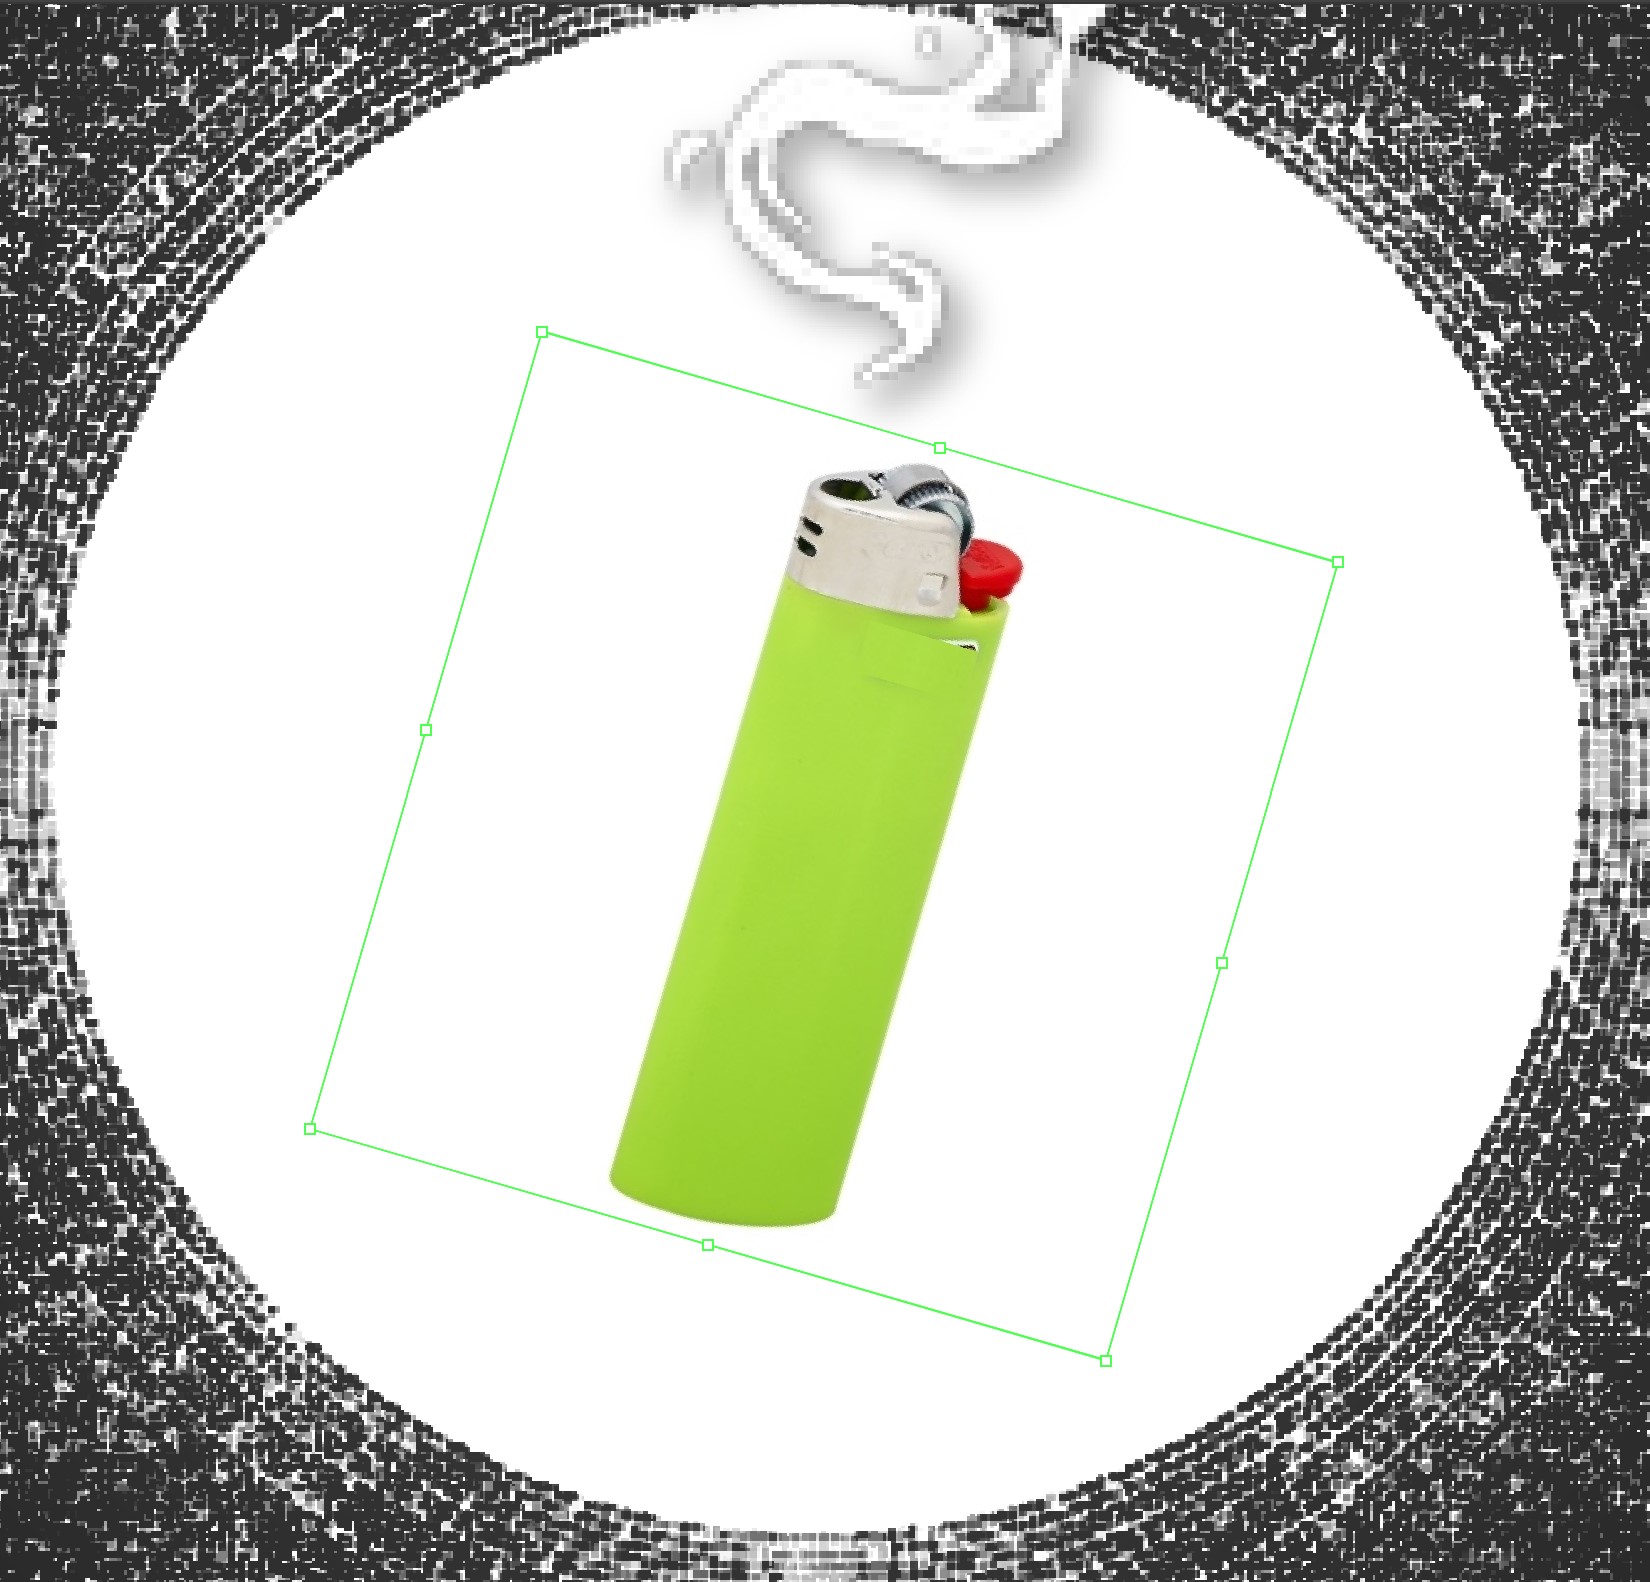
Your lighter is not reading as a lighter. You’ve scribbled it too much and lost a lot of the detail. Unless retro lighters are the rage now, the younger demographic isn’t going to guess it (bic click age) but the older fans might.
Explain how this is better than the original cover art.
If this is a full sized vinyl album cover and you are printing in “rich black” you would have to consider the specs supplied by the album cover printer. Most are printed CMYK in some fashion. However, the point of album art is to look good. The printer should have the chops to pull of near perfect 4-color registration for such a piece. If you take a loupe to the printed art, you may see some color encroachment, but you won’t see it with the naked eye.
To jump on what PrintDriver has already mentioned, you also have “Patients” in the back and “Patient” in the front cover. Be very careful about typos and, of course, using words correctly. You’re also missing commas in the album title. In addition, if you look at Foo Fighters album covers, they don’t necessarily stick to one style and even the logo they use changes from album to album but there’s still something about the art that’s very “Foo Fighters”. That being said, your art doesn’t quite work for me as a Foo Fighters album cover. The placement of the album title in the front cover doesn’t work. Separating the words that way is awkward.
The “distorted lighter” in the front cover appears to me more like a silhouette of a man with a hoodie looking down. I would also stay consistent with the fonts you’re using for the band’s name in the front and back cover. The spacing between the song names and running time is not consistent throughout either.
As far as printing, PrintDriver is correct. I would only say that you would have to make sure to use high res images/art (hard to tell but the “smoke” image seems to be a lower resolution than the rest of the art).
Printing something unusual like you’ve shown might require some special measures.
I wouldn’t use a rich black. One of the reasons being what you mentioned about registration in all that fine detail. Today’s commercial offset is awfully accurate, but there’s always that chance on a high-speed run — especially with card stock.
The main reason, though, is that CMYK just wouldn’t be needed, so there’s no reason to chance it. The cover is only black and red, which would lend itself to a couple of spot colors. To get the deep, solid black you’re after, a double hit of the black would be better. I might also choke the second hit just a tiny amount to prevent filling in the fine detail. You might also consider a spot varnish or UV as opposed to an aqueous flood coating.
I’d need to see the artwork up close to see what kind of halftone dot might be appropriate (or if one was even needed at all).All that fine detail has some similarity to stochastic halftone dots, so superimposing a standard halftone screen over it might be best avoided. If a halftone is needed at all, a stochastic dot might be the best choice.
Sorry for the jargon, but explaining all the terms would have doubled the length of the post. Most important, though, is that as a student, understanding the basics of these sorts of things will be important. In a real-life situation, you as a designer, would need to consult with the printer on quirky jobs like this one to determine the best way to prepare the artwork and achieve what you’re after during the printing. Knowing the options, the processes, the reasons for them, and the terminology would help you do that and would facilitate the needed discussion with the printer.
Was going to say the same thing B! Working in packaging printing, we often either do a double hit of black, or a 50% cyan build behind the black to achieve a “rich black” (trimmed back just a hair like you mentioned in case registration isn’t perfect on longer runs). Both have cost savings and the cyan build instead of a 2nd black prevents a wash-up in case it’s only a 4-color press.
Varnish would be a great cost-saver! Might take a day or two extra to dry with that much black, but a lot of the time it’s worth the savings. Personally not a huge fan of UV coating, I hate the smell.
When I first started out (just before computers changed everything), we always used a 20% cyan screen tint to beef up a solid black on 4-color work. I suppose the reason for limiting it to only cyan was that using the other two process colors to achieve today’s “rich black” would have increased the stripping costs — a non-issue today.
to start, it’s “patience” not patients or patient…
thanks, Ill work on my spell check
That’s a little different from your interpretation.
way different from my interpretation of life and mortality, good catch!
Your lighter is not reading as a lighter. You’ve scribbled it too much and lost a lot of the detail. Unless retro lighters are the rage now, the younger demographic isn’t going to guess it (bic click age) but the older fans might.
I guess the quality of the upload and the size really take away a lot of the details. If you zoom in its a lot better. See:
Explain how this is better than the original cover art.
Sent it to Dave Grohl and he was like “This is awesome cover art, dude, can you send me $500 for weed though. My direct transfer account is 4739837376367”
See. When considering “rich black” always ask the printer for advice.
I was wondering about a 2-color run.
And seeing the closeup of the “dot” pattern yeah, moires could definitely be an issue and I’m not sure a double strike will work with those grayscale tones.
Jargons good, gives me a chance to go do some research on the subject. I didn’t think about doubling up on the black. We were always told that rich black would be CMYK. I ordered that pocket pal book you recommended so hopefully Ill understand more about this stuff soon.
Rich black isn’t always CMYK. Depends on if you want it cool or warm and what the printer’s ink limits might be if it’s digital. You can affect the tone of black. Adding cyan makes it ‘cooler’, adding magenta (and/or yellow) can make it ‘warmer.’
But I do digital print. Presses with plates, might vary some.
I never thought of that. That you could make black warm or cool. So for my album cover, I could use a 50% cyan to give it a cool black look (no pun intended)
A standard offset press has 4-6 tanks. Typically, 4 of them are set up as Cyan, Magenta, Yellow, and Black. With the extra tanks being for spot/PMS colors. If you use a 50% cyan build or similar to deepen the black, then you can use the existing cyan and black tanks. If you do a double hit of black, then you either have to use one of the spare tanks, or one of the original 4. Both would require a “wash up” charge to throughly clean the tank, allowing your color to be accurate. Recently had an issue with this with a cream color turning out blue because the tank wasn’t properly washed up from the prior run, which had blue in that tank.
Varnish is typically ran on a smaller 2 color press, and isn’t as “instant drying” as aqueous though they produce a nearly identical effect. The benefit is the smaller presses have a cheaper hourly rate, quicker setup which reduces labor, and the varnish in general costs less than aqueous. But yes needs a longer dry time, especially for heavy print coverage. And yes a 50% build would give it a “cool black” look
Note: a lot of printers use a warm black as their standard black. So hitting it with the cyan also helps balance that out a bit (:
Ah, the black ink thing. Straight up K on the digital presses I use is often more on the magenta side to start with. Which makes printing gray tones even more fun sometimes.
Oh man I could imagine. I just actually sent in a file to prepress that was a full black gradient background… Interested to see how it turns out lol. We are hitting it with 50% cyan though to cool it off a bit but still gonna be interesting.
A lot depends on the stock, but a 50% cyan might begin to look more like an extremely dark bluish-black rather than black. Twenty percent cyan is typically used because it’s just enough to increase the ink density without noticeably shifting the black to something that looks not-quite black.
Substituting magenta for cyan doesn’t, in my opinion, create so much a warm black color as it does in shifting the black off into a reddish direction or extremely dark burgundy. What I’d regard as a warm black would require a little yellow mixed in.
In today’s “rich blacks” that are composed of all four process colors, the three non-black inks combine to create a gray, which doesn’t shift the black off in any particular direction — it mostly just darkens it up.
A little side trip, I tend to advise to avoid magenta in black as well when doing anything going on stage or on camera. Large digital prints can get weird under theatrical lighting in either instance, though more so on camera, which goes RGB internally. The lighting gel colors that make human flesh look good, can sometimes make magenta ink pop more. Sometimes the wrong lighting angle can do the same thing. For something large and expensive, we always try to do a camera test under similar lighting conditions. A good lighting tech can usually fix this when used on a stage or on TV, but with more and more mid to large sized companies shifting to internally produced digital web broadcasts, a good lighting tech, or even good lighting fixtures, are sometimes not in the mix.