I’ve got an assignment!
I’ve made some cocktail menu inserts for plastic table top sign holders, about 4" x 5".
I remembered that there needs to be some bleeds because the printing sometimes won’t be exact when it comes to double sided prints, which these are.
So I followed the directions at this link, and added a 1/8" bleed to the whole thing.
So the background image I used was resized to take into account the extra eight of an inch on all four sides.
Now, I’m bout ready to print, but I’m wondering, do I need to put cutlines somewhere in the image? Would that mean enlarging the canvas further to insert cut lines at each corner? Or does the printer already know to cut an eight of inch automatically?
The only person that really can answer that is the printer.
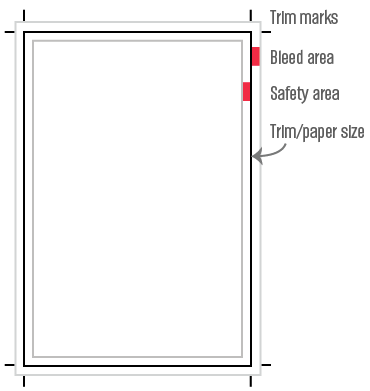
The standard way is “usually” to make your artboard the size of the print and a let the bleed hang off. Then apply crop marks to show the trim.
But some places have standardized templates that put all the bleed and trim marks on the artboard. If so, use the template. The key is the trim marks.
(most of the stuff I print, all large format and weird stuff, we like all the bleed and crops on the artboard and any cut paths unstroked and unfilled on a separate non-printing layer. Our bleed sometimes measures in inches. But we’re weird.)
That’s not quite correct. Although you’re right about the possibility of the positioning of the front and back sometimes not being exactly the same, that’s only one reason for bleeds (and safeties). The more typical reason is when there is printed materials bleeding off the edge, it’s necessary to extend those printed materials out beyond the edge of the artboard to create a little wiggle room for when the paper is trimmed to size. Printers typically print on large sheets of paper and trim the sheets of paper to the correct size after they’ve been printed. If it’s an option for you sometimes, it would be a really good idea to have a long conversation and a tour of a printing plant to get some idea of how it’s all done.
The safety is an equivalent amount of space inside the trim area. Think of it this way, if the printer ends up trimming the paper a millimeter or two off, it won’t matter all that much if you’ve included a bleed. Likewise if that not-quite-accurate trim is off in one side of the paper, it will also be off on the other side and could risk cutting into the image.
The safety is that zone inside the trim area where you don’t want to place any type or other objects that would ruin the job if the trim cuts into that area. Generally, the safety is offset from the trim size by the same amount you used for the bleed. In other word, if the bleed is 1/8", the safety also needs to be 1/8". In other words, keep the essential stuff well away from the edge of the trim. A 1/8-inch (or 3mm) bleed and safety are standard for most offset job, but like PrintDriver mentioned, it will depend on the printer. On large format jobs that are feet or meters wide, the bleed and safety need to be larger. On a web press (like with a newspaper), those measurements are typically larger too.
Yes, most of the time unless the printer requests differently, and I have, on occasion been asked by printers not to include them. When in doubt, include them. By the way, they’re generally referred to as trim or crop marks, not cutlines. In printer/designer/publishing jargon, cutlines are the captions beneath photos. (It’s a term from the old paste-up days when those captions were literally cut and pasted beneath the photos.)
What layout application are you using? InDesign, Illustrator, QuarkXPress, etc., all have special features to address this. Normally, you just make the artboard the size of the final trim size of the paper, then specify in the settings that you want, say an 1/8" or 1/4" or whatever bleed. It automatically adds the extra space. Same with the trim marks. You specify you want them in the application settings, then specify how far removed you want them to be from the artboard. Always specify enough distance away from the artboard that so that the trim marks don’t intrude on the bleed. For what it’s worth, this extra space where trim marks go (and sometimes registration marks and color bars) is called the slug. You generally don’t need to worry about the slug area, but most layout applications include a setting for it. I’ve never yet had a printer complain about me not specifying a slug (so let’s see if someone here has a differing view on that).
As a print operator, personally it bothers me when the client adds crop marks to the print-ready file. Or attempts any other pre-press task for that matter. Bleed is essential, so certainly add that. However when a file comes in with crop marks, I have no choice but to drop the file back in InDesign, and at the very least, ensure the client has marked the file correctly.
Also, the default location for crop marks on many design applications places the marks within the bleed area (half in, half out). And depending on the nature of the cutting, machine duplex accuracy, cutting accuracy, There’s a chance that part of the mark may appear in the final piece.
If I have a file with simply the bleed, no marks, I can use my imposition software to check the margins, allocate the marks, and impose, without the worry that something hasn’t been done incorrectly on the client end.
You know Biggs, I’ve had printers tell me that exact same thing about crop marks, so I stopped adding crop marks on jobs with no complaints. Three or four years ago, on this forum, I mentioned this and was roundly criticized by other designers and a prepress operator or two.
Since then, I’ve been including crop marks unless the printer has specifically asked me not to. Typically, though, when I ask the customer rep about it, I’ll get a long pause and an answer about having to get back to me about it.
It can’t hurt to ask, right? I’m only one person, though I know of many press operators who feel the same as I do - But that’s not to say others may find the crop marks favorable. For me it creates an uncertainty, and in print, we don’t deal with uncertainty.
Another thing that bothers me, is I can’t immediately tell if i’ve been handed a file that’s even the right size for the order. If I open the PDF and the file size states 8.75x11.25, and the order ticket calls for 8.5x11 with bleed, I know i’m good to go.
I love the files that have “the works” included. Crop marks, density patches, registration marks, file name, the designer’s mother’s maiden name
Graphics Designers shouldn’t criticize unless they’re running the hardware, i’m surprised a pre-press tech would argue, though some more sophisticated (and crazy expensive) pre-press/impose software may allow them to except a wider array of files.
In wide format, I want them, for a lot of different reasons beyond conventional pre-press needs. Like Biggs said though, not the PDF kind that double up black over white inside the bleed that is already set too small for what I do. I don’t want PDFs anyway but especially not ones with crop marks. I can’t tell you how many times I’ve had to retouch crop marks out of photoshop files to make a press deadline. InDesign has a handy script built in that allows you to specify the crop mark offset. The rest of them, not so much. The trouble with most PDF handoffs, if they don’t specify the bleed or crops correctly, all I get is the no-bleed art on the trim size.
I get the no-crop-mark thing too. The latest rips have all sorts of different pre-press timesavers on them now. Which ones are used by which print vendors is always a “gotta ask” situation. I have one specialty vendor where putting bleed and crops on the artboard saves me $xxx per job in set up fees. They don’t even bill me that first hour.
But I’m in a weird industry.
This has been educational, thanks everyone.
@Just-B
I’ve been making these inserts in Photoshop, so I guess that’s where I messed up. I manually created a bleed, and I was about to manually create a slug to make room for crop marks, which I was going to create myself.
Just now, I tried opening up InDesign and margins, bleeds and slugs were all available when creating a new document! So much easier.
Can I just flatten my photoshop file and copy & paste it in InDesign? Or would resolution suffer? Maybe just transfer each layer manually (background, text, and photo)?
@Biggs
Do you mean adding crop marks manually into the file, and not via the InDesign feature?
Or if I’m creating it with a bleed, I don’t need to add crop marks in any fashion?
The area that has “crop marks, density patches, registration marks, file name” etc would be included in the slug area right?
@PrintDriver
I was reading at Adobe’s site how you can add crop marks once you save the InDesign file as a PDF. So that’s a bad idea as it will put the crop marks inside the bleed area?
So would it be better if I just create my own crop marks in the slug area?
Photoshop is, as the name implies, an application for working with mainly photos. It’s generally not a layout tool for many of the reasons we’ve already discussed. There are many other reasons, though. One of them has to do with resolution.
A 300ppi photo in Photoshop is fine since photos are never razor sharp. The edges of typography and graphics, however, need to be sharp. The output resolution of most output devices can be up to ten times that. So to achieve the same kind of sharpness from a flattened Photoshop file, that file would need to be flattened at two- or three-thousand ppi, which just isn’t practical. And if you’ve built that Photoshop layout in RGB, you’ll end up with all your black type being composed of the process colors instead of just black. The slightest bit of press mis-registration will produce an unwanted rainbow effect around the edge of the black letter.
If I were you, I’d rebuild the menu in InDesign from scratch.
You also asked about crop marks. If you save your InDesign file to a PDF, you’ll have the option of how far out to offset those crop marks from from the trim size. If your bleed is 1/8 inches (0.125"), set your crop mark locations to be at least that far away from your trim so that they don’t intrude on the bleed. Based on the previous discussion, you might want to ask your printer whether or not they want crop marks added.
Thanks, I’ll be redoing it tonight.
I’m really bad with InDesign but this will give me an opportunity to get better acquainted with the program.
Are these the menus we’ve been talking about?
https://www.graphicdesignforum.com/t/drink-menu-insert-opinions/7131
If so, they basically are large photos, which is fine. Just place the background photos into InDesign, then use InDesign for all the type except the big headline type that’s part of the photo. Easy stuff.
They look really nice, by the way.
2 Likes
Yes they are, and thank you.
I’m not familiar with InDesign but I’m getting a better understanding of PS, AI, and ID, and how they complement each other, with ID being the big one.
I wouldn’t ever recommend adding the marks in myself. If you do it correctly, there’s no harm really done, except a formidable waste of time. Anything to avoid a mistake in the finishing of a job is a must, and simply exporting a print-ready PDF and having Adobe add the marks is the way to go. Remember, the crop marks won’t come into play until the final stages of the production process, and if you have a mistake there, you’ll most likely be paying for an entire reprint. Print shops don’t take kindly to errors on the clients part, nor should they, production time is the most valuable resource, and wasted time is wasted money.
“it’s just paper and ink!” they say. It’s everyone’s precious time and experience you’re paying for.
Adobe PDF will add as much space along the outside of the image area as it needs to add all those other marks, guides, and tools. I’m rather certain you will never need them, unless you’re on the operater end of things.
Oh, and learn InDesign. It’s critical. and if you’re into print media, there’s no way around it. PS’s print tools are near non-existent, and AI’s are mediocre at best.
Plus, how are you going to make a layout? Toil endlessly in PS? or quickly understand how poorly AI handles imported images, alignment, and large files sizes.